Sales tax compliance is one of those things that quietly drains your finance team’s time, until it becomes a full-blown problem. Manual tax calculations, misapplied rates across jurisdictions, and audit exposure all add up fast, especially for midsized companies selling across multiple states. The Avalara NetSuite integration solves this by automating tax determination, calculation, and filing directly inside your ERP.
But getting the integration right matters just as much as having it. A poorly configured connection between Avalara and NetSuite can create tax mapping errors, slow down transaction processing, and generate compliance gaps that defeat the entire purpose.
At Concentrus, we implement and optimize NetSuite for midsized companies, and Avalara is one of the solutions in our Concentrus Partner Network™ that we regularly deploy to extend ERP value. We’ve seen firsthand what separates a clean, high-performing Avalara setup from one that causes headaches. This guide walks you through the setup steps, configuration details, and best practices you need to get the integration running correctly from day one.
What to plan before you start
Jumping straight into the Avalara NetSuite integration without preparation leads to rework. Before you touch a single configuration setting, you need a clear picture of your tax obligations, your NetSuite account status, and your data. Taking 30 to 60 minutes upfront to work through these planning steps will save you hours of troubleshooting after go-live.
Know your nexus footprint
Your nexus is the set of states where your company has a legal obligation to collect and remit sales tax. This could be based on physical presence (offices, warehouses, employees) or economic nexus thresholds triggered by sales volume or transaction counts in a given state. Write out every state where you have nexus before you open Avalara. You’ll configure these directly in the integration, and getting them wrong means either over-collecting or creating compliance exposure.
Avalara uses your nexus list to determine when tax applies, so an incomplete or outdated nexus configuration is the most common source of calculation errors after setup.
Confirm your NetSuite account details
Confirm that you have your NetSuite Account ID ready and that your account runs on a supported NetSuite version. Avalara’s SuiteApp requires a specific minimum release, so check your current version under Setup > Company > Company Information. Also verify that you have Administrator role access in NetSuite, because the installation and permission steps require it.
Audit your item and customer data
Pull a list of your top transaction items and check whether they already have tax codes assigned. Avalara uses AvaTax codes to determine the taxability of each product or service. Review your customer records for accurate ship-to addresses, since Avalara calculates tax based on destination. Missing or malformed addresses will trigger API errors during live transactions.
Before you move to setup, confirm you have this data ready:
- A complete item list with taxability categories noted
- Customer ship-to addresses verified and correctly formatted
- Exemption certificates on file for any tax-exempt customers
Step 1. Choose the right connector and environment
Avalara offers two paths for connecting to NetSuite: the native AvaTax SuiteApp built and maintained by Avalara, available directly in the NetSuite SuiteApp Marketplace, and fully custom API integrations. For most midsized companies, the native SuiteApp is the correct choice because Avalara keeps it current with compliance updates, and it requires no custom code to deploy.
Pick the SuiteApp edition that matches your license
Your NetSuite license type determines which SuiteApp edition you install. Avalara publishes one edition for OneWorld accounts that manage multiple subsidiaries, and a separate edition for single-entity accounts. Installing the wrong edition creates permission conflicts that are difficult to untangle. Before downloading anything, confirm your license type under Setup > Company > Company Information in your NetSuite account.
Installing the OneWorld edition on a single-entity account, or vice versa, will prevent the integration from activating correctly and requires a full reinstall to fix.
Decide whether to start in sandbox or production
Before you configure the Avalara NetSuite integration in your live environment, run the initial setup through your NetSuite sandbox. Avalara provides a dedicated sandbox account that connects to NetSuite’s sandbox, letting you test transaction flows, nexus rules, and tax code mappings without touching real financial data. Contact your Avalara account manager to request sandbox credentials before you move to the next step.
Step 2. Install the SuiteApp and set permissions
Once you’ve confirmed your connector choice and sandbox credentials, you’re ready to install the Avalara NetSuite integration SuiteApp directly inside NetSuite. This step requires Administrator role access, so log in with an admin account before you proceed.
Install from the SuiteApp Marketplace
Navigate to Customization > SuiteCloud > SuiteApp Marketplace inside your NetSuite account. Search for “AvaTax” and select the correct edition that matches your license type from Step 1. Click Install, review the terms, and confirm. The installation typically completes in under five minutes, and NetSuite will notify you when it finishes.
Do not navigate away from the installation screen until NetSuite confirms completion, as interrupting the process can leave the SuiteApp in a broken state that requires a full reinstall.
Assign roles and permissions
After installation, you need to grant the correct permissions to each user role that will interact with tax calculations. Go to Setup > Users/Roles > Manage Roles, open each relevant role, and verify that the AvaTax permission entries appear under the Transactions and Lists tabs. Your accounts receivable team needs create and view access, while your system administrator requires full control.
Confirm these permissions for each role before moving to the next step:
- AvaTax Tax Calculation: Create, View
- AvaTax Configuration: Full (admin only)
- AvaTax Exemption Certificates: View, Create
Step 3. Connect Avalara and configure nexus
With the SuiteApp installed and permissions set, you’re ready to link your Avalara account to NetSuite and configure your nexus settings. This is the step where the Avalara NetSuite integration becomes active and starts routing transactions through Avalara’s tax engine for real-time calculation.
Enter your Avalara credentials
Navigate to Setup > Tax > AvaTax Setup inside NetSuite. Enter your Avalara account number and license key, which you’ll find in the Avalara Admin Console under Settings > License and API Keys. Select the correct environment, sandbox or production, based on your decision in Step 1.
Click Test Connection to verify the link. A successful result shows a green confirmation message in NetSuite. If you see an error, confirm that your license key contains no extra spaces and that the environment selection matches the credentials you’re using.
Never use production credentials in a sandbox environment. Doing so will push test transactions through your live compliance account and can corrupt your filing data.
Add and verify your nexus states
After confirming the connection, go to Setup > Tax > Nexus in NetSuite and add every state where your company has a tax obligation. For each entry, select the correct jurisdiction type based on your actual exposure. Cross-reference each state against your planned nexus footprint using these common triggers:

- Physical office, warehouse, or employees in the state
- Economic nexus threshold met (typically $100,000 in sales or 200 transactions)
- Marketplace facilitator rules if you sell through third-party platforms
Step 4. Map items, customers, and addresses
With your nexus configured, the next step is mapping the data that the Avalara NetSuite integration uses to calculate tax on every transaction. Accurate item tax codes, customer exemptions, and ship-to addresses are what determine whether Avalara returns the correct tax amount or flags an error on a live order.
Assign AvaTax codes to items
Open your item records in NetSuite under Lists > Accounting > Items. For each product or service, locate the AvaTax Tax Code field and assign the correct code from Avalara’s tax code library. Use P0000000 for most tangible personal property and SW054003 for downloadable software as a starting reference. Work through your highest-volume items first to cover the majority of your transaction volume before go-live.
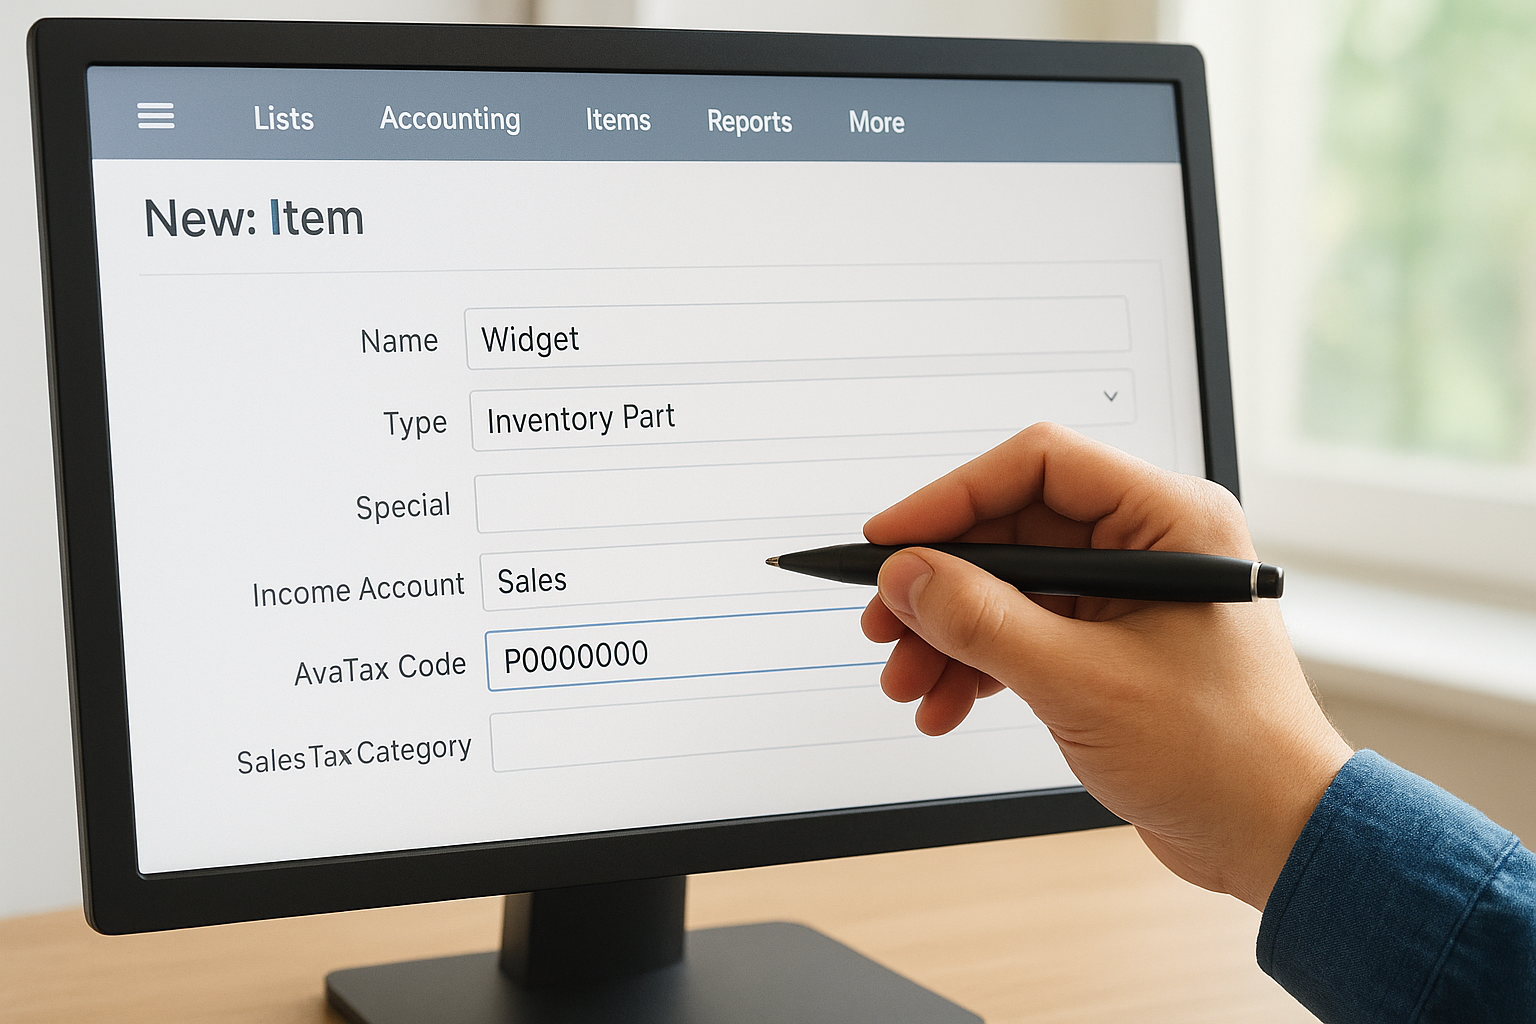
Using a generic or incorrect AvaTax code on a product can result in under- or over-charging tax, which creates both customer complaints and compliance risk.
Verify customer addresses and exemptions
Pull your customer records under Lists > Relationships > Customers and confirm that every ship-to address includes a valid street, city, state, and ZIP code. Avalara validates addresses in real time, so malformed entries will cause the tax call to fail on that transaction.
For tax-exempt customers, attach the exemption certificate directly to the customer record using Avalara’s CertCapture feature. This ensures exemptions apply automatically without requiring manual overrides on each individual transaction.
Step 5. Test, go live, and monitor tax data
Before you flip the Avalara NetSuite integration to production, run a structured set of test transactions in your sandbox environment to confirm that every configuration element works correctly. Use real-world order scenarios that reflect your actual transaction mix, including taxable sales, exempt sales, and multi-state shipments.
Run test transactions in sandbox
Create at least three test sales orders that cover your most common transaction types. Confirm each order pulls the correct tax rate, that exempt customers show a $0 result, and that multi-state shipments apply nexus-state rates. Check the AvaTax transaction log in the Avalara Admin Console to verify every call resolves without an error code.
If any transaction returns zero tax when it should not, trace it back to the item tax code or ship-to address before you proceed to production.
Use this pre-launch checklist:
- Taxable in-state sale: correct jurisdiction rate applied
- Tax-exempt customer sale: $0 tax, certificate attached
- Multi-state shipment: nexus-based rate confirmed
Monitor after go-live
Once you switch to production, review the AvaTax dashboard weekly for your first 30 days. Track error rates, unresolved address warnings, and any transactions that bypassed the tax engine.
Pay close attention to address validation failures and unexpected zero-tax results. Both signal a data mapping gap that needs correction before your next filing period.

Wrap-up and next steps
A well-executed Avalara NetSuite integration reduces compliance risk, eliminates manual rate lookups, and frees your finance team to focus on higher-value work. The steps in this guide cover everything from pre-setup planning and connector selection through item mapping, testing, and post-launch monitoring. Follow them in order and you avoid the configuration gaps that cause most integration failures.
Your next priority after go-live is staying current. Nexus rules and economic thresholds shift as states update their tax codes, so schedule a quarterly review of your Avalara nexus settings and AvaTax codes to keep your configuration accurate over time.
If you want expert help deploying Avalara inside NetSuite, or if your current ERP setup is not delivering the ROI you expected, talk to the Concentrus team. We implement and optimize NetSuite for midsized companies and build integrations that tie directly to measurable financial outcomes.