

Everything in your ERP implementation can go right, clean data, solid configuration, thorough testing, and still fall apart during cutover. A data migration cutover plan is the bridge between your legacy system and your new environment, and it’s where timeline pressure and operational risk collide. One missed step, one overlooked dependency, and you’re staring at corrupted records, broken integrations, or an extended period of downtime that hits your bottom line.
The challenge isn’t just technical. CFOs and finance leaders need confidence that the switch won’t disrupt financial closes, reporting accuracy, or daily operations. That means your cutover plan has to account for more than data, it needs clearly defined roles, fallback procedures, and validation checkpoints that protect your ROI.
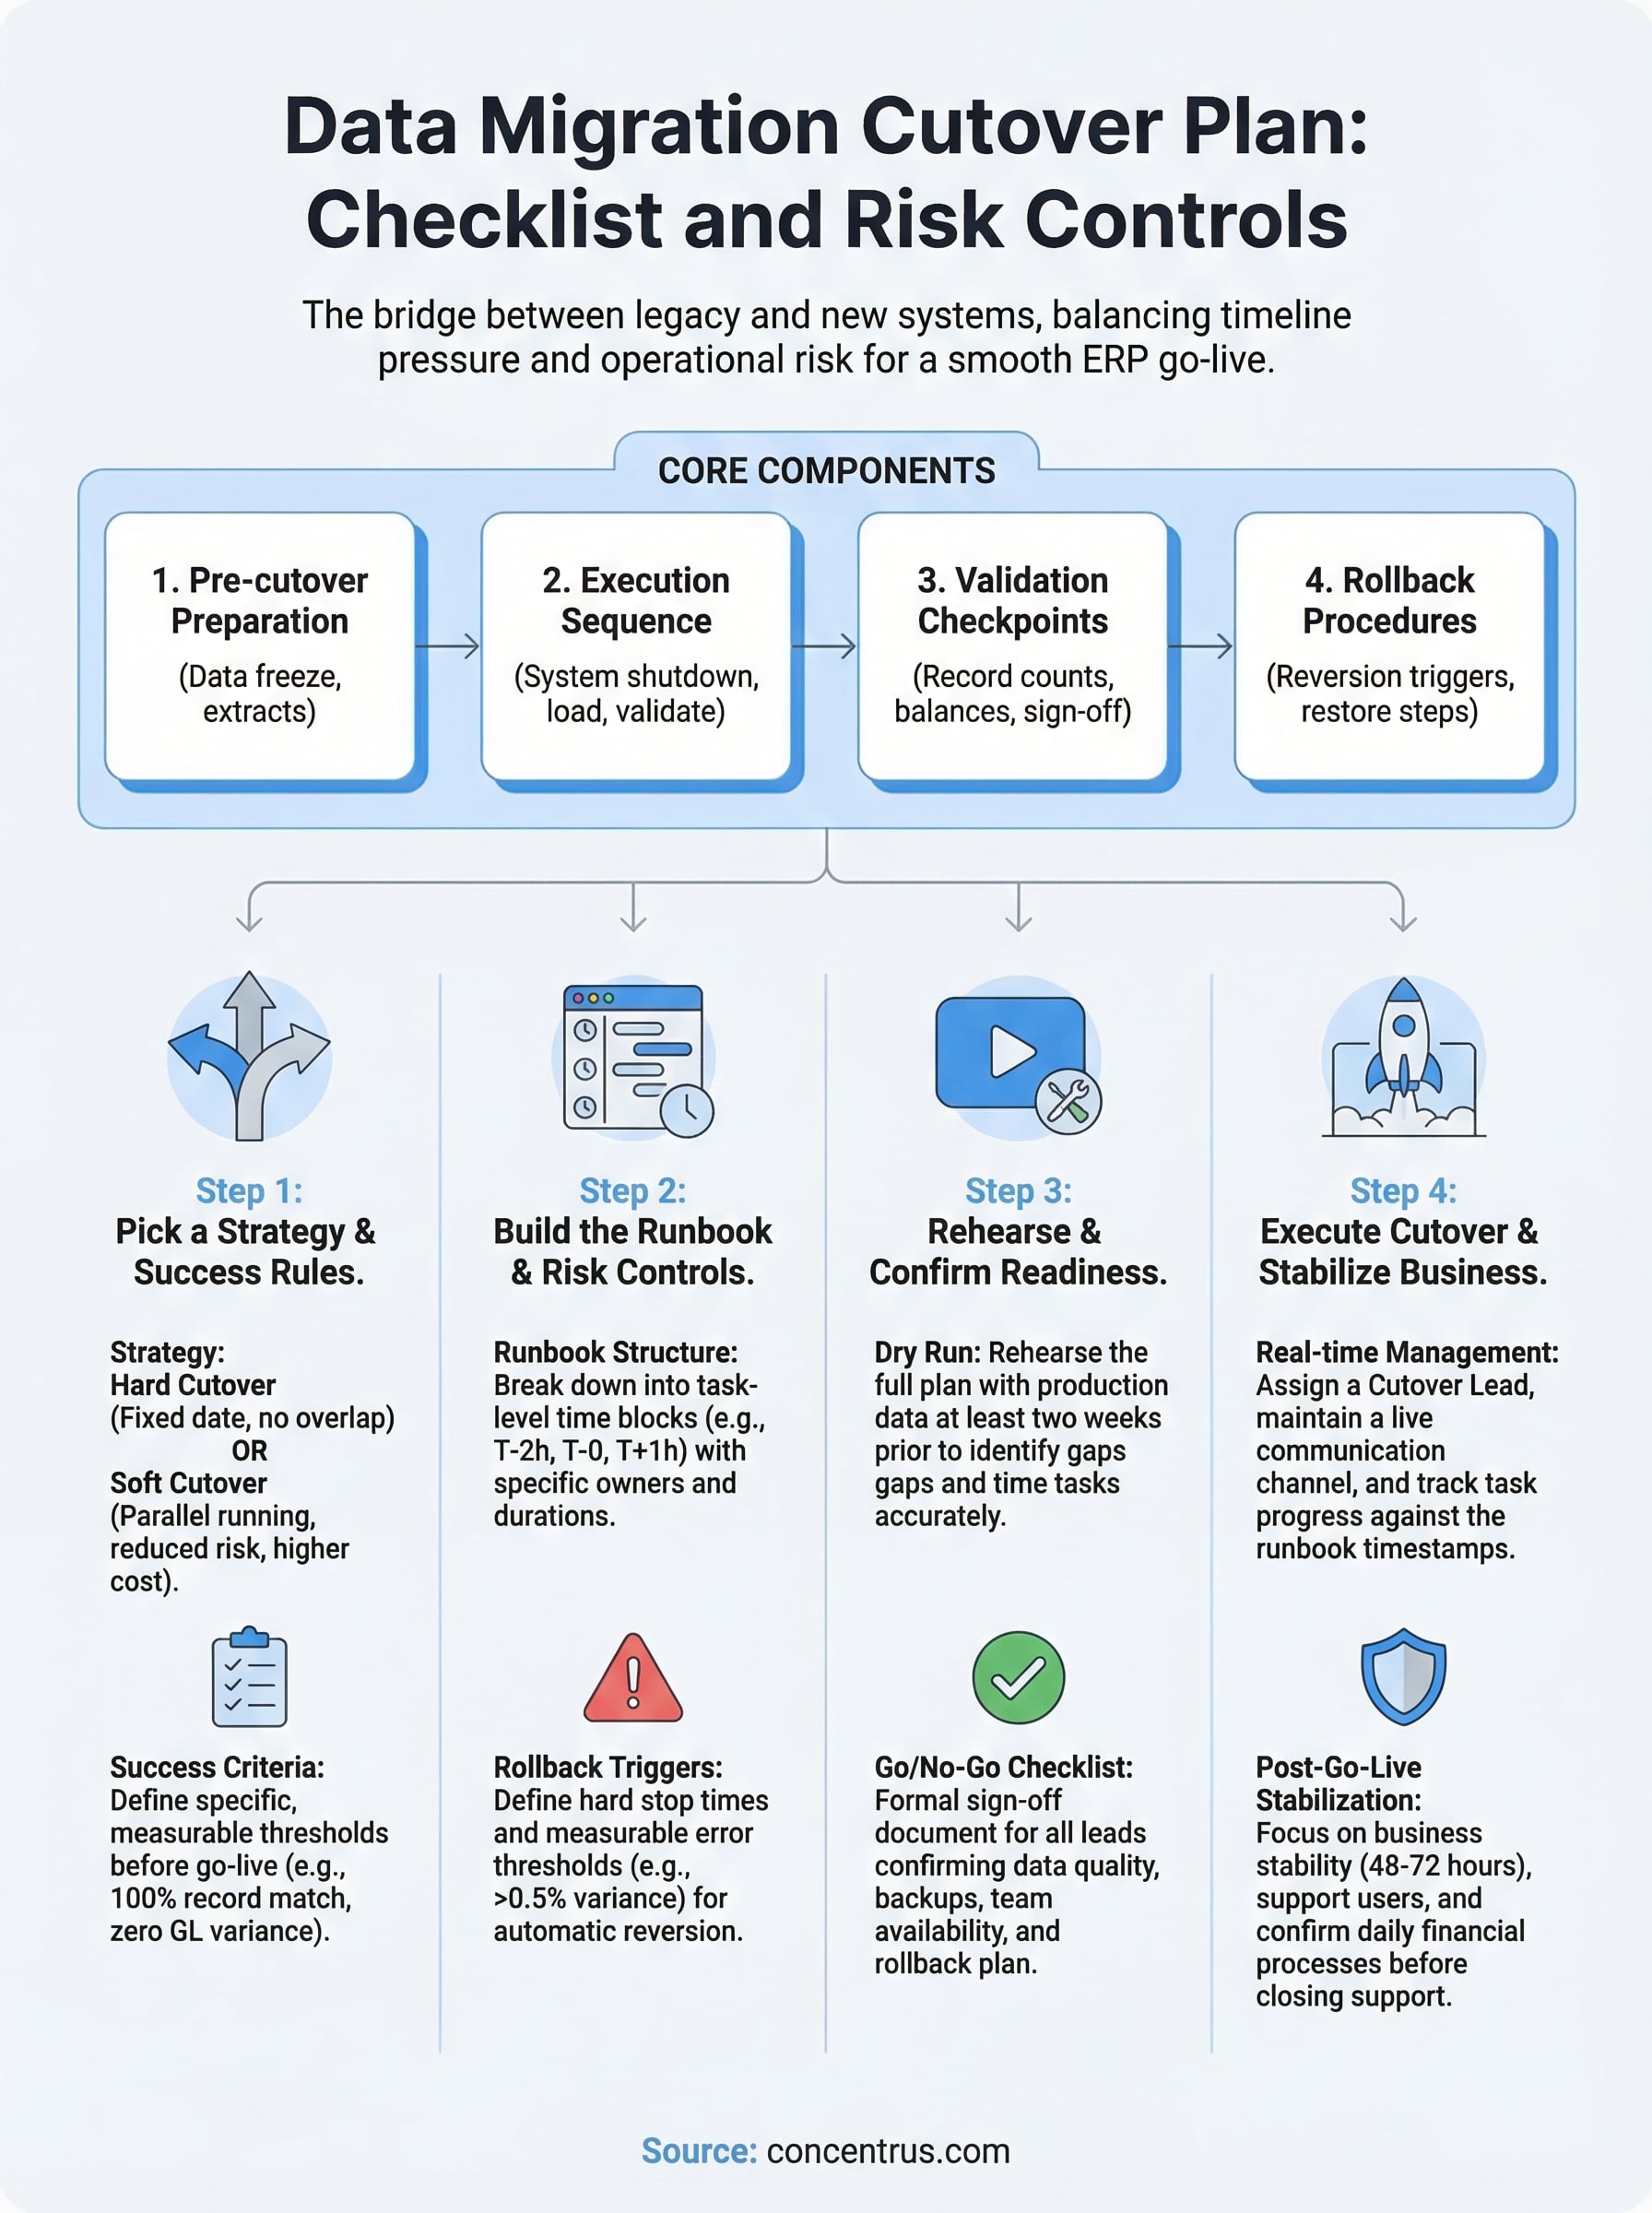
At Concentrus, we’ve built and executed cutover plans across hundreds of NetSuite and Acumatica ERP implementations, and rescued plenty where the original plan wasn’t up to the task. This guide breaks down the key components of a solid cutover plan, including hard vs. soft cutover strategies, step-by-step checklists, and the risk controls that keep your go-live on track.
What a data migration cutover plan covers
A data migration cutover plan is a structured document that defines every action required to move your business from a legacy system to a new one. It is not just a checklist. It specifies who does what, in what order, and within what time window, and it defines exactly what happens when something goes wrong. Think of it as the operational blueprint for your go-live window.
A cutover plan without clearly defined roles and rollback triggers is just a wish list.
The core components
Most cutover plans break down into four layers: pre-cutover preparation, the cutover execution sequence, validation checkpoints, and rollback procedures. Each layer depends on the one before it. If your data quality checks are not completed before the cutover window opens, your validation steps will surface problems at the worst possible time, and you will have no clean path forward.

Here is what each layer typically includes:
| Layer | Key Activities |
|---|---|
| Pre-cutover preparation | Data freeze, final extracts, backup confirmation, integration disabling |
| Execution sequence | System shutdown, data load, configuration validation, integration re-enablement |
| Validation checkpoints | Record counts, financial balances, open transactions, user acceptance sign-off |
| Rollback procedures | Reversion triggers, backup restoration steps, communication templates |
What makes it different from a project plan
Your project plan maps the months leading up to go-live. Your cutover plan zooms in on the final hours, covering every task at a near-minute-by-minute level. The difference matters because the teams responsible shift dramatically. During cutover, your technical leads, finance team, and business stakeholders all need to operate in tight coordination, often under pressure, with no room for ambiguity about ownership.
Sequential dependencies are where most cutover plans fall short. Your accounts receivable team cannot validate open invoices until the data load completes, and your integration team cannot re-enable your payment gateway until AR confirms records match. Mapping those handoff points explicitly is what separates a plan that holds under pressure from one that creates chaos at go-live.
Step 1. Pick a cutover strategy and success rules
Before you build any checklist, you need to lock in two decisions: how you will switch from legacy to new, and what “success” looks like at the end of your cutover window. These choices drive every other element of your data migration cutover plan, from the length of your maintenance window to the conditions under which you halt and roll back.
Hard cutover vs. soft cutover
A hard cutover means you set a fixed date, shut down the legacy system, load your data, and go live on the new platform with no overlap period. This approach works best when your data is clean, your team has rehearsed the process, and your business can tolerate a defined maintenance window. A soft cutover runs both systems in parallel for a set period, letting users validate the new environment against the live legacy system before fully switching over. Parallel running reduces risk but increases cost and team workload significantly.
Choose your strategy based on your business’s actual risk tolerance, not on what feels safer in the moment.
Define your success criteria before go-live
Your success criteria need to be specific and measurable, not general. Before cutover begins, document the exact thresholds your team will use to confirm the migration succeeded. Here is a working template:
| Criteria | Target | Owner |
|---|---|---|
| Record count match | 100% | Data lead |
| GL opening balances | Zero variance | Controller |
| Integration smoke test | All endpoints responding | IT lead |
| User login confirmation | All active users verified | System admin |
Step 2. Build the runbook and risk controls
A runbook is the task-level document that sits inside your data migration cutover plan and tells each team member exactly what to do and when. Unlike a high-level project plan, your runbook assigns specific tasks, time estimates, and owners to every action in the cutover window, so no one has to make judgment calls under pressure.
Structure your runbook by time block
Break your runbook into time blocks rather than loose phases. Each row should capture the task, owner, estimated duration, start time, and a status field your team updates in real time. Here is a working template:
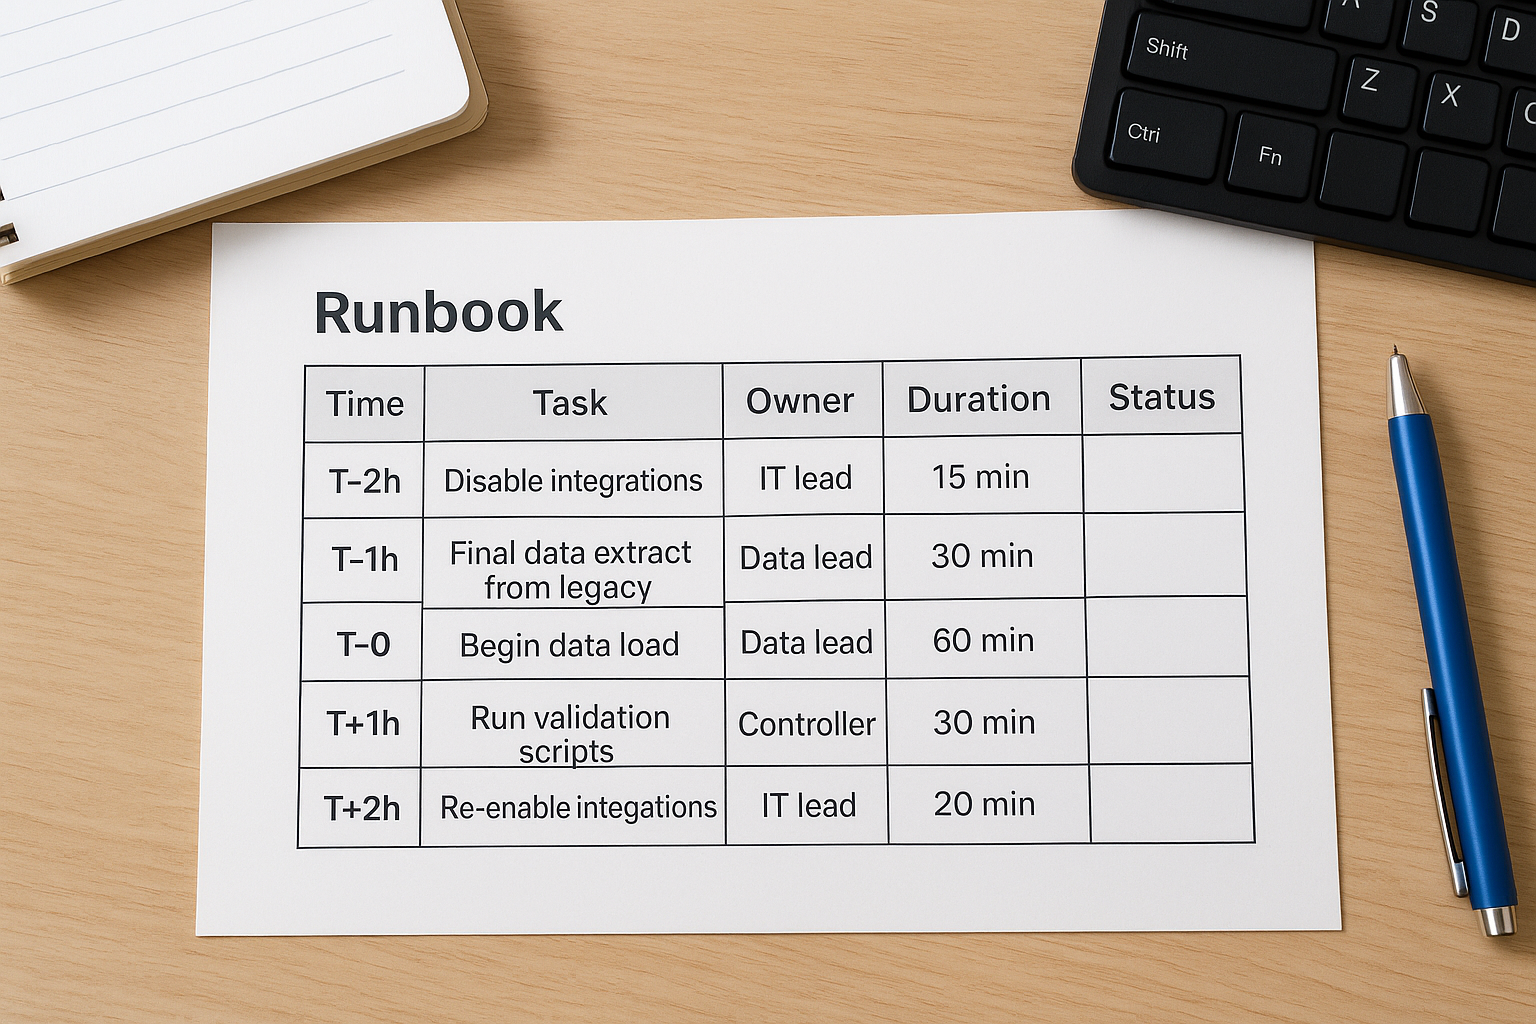
| Time | Task | Owner | Duration | Status |
|---|---|---|---|---|
| T-2h | Disable integrations | IT lead | 15 min | |
| T-1h | Final data extract from legacy | Data lead | 30 min | |
| T-0 | Begin data load | Data lead | 60 min | |
| T+1h | Run validation scripts | Controller | 30 min | |
| T+2h | Re-enable integrations | IT lead | 20 min |
Define your rollback triggers
Your runbook needs a dedicated rollback section that states specific, measurable conditions that force a stop-and-revert decision. Do not leave this to a group conversation during the cutover window.
Define your rollback threshold before go-live, not during it.
Document at minimum two triggers: a hard stop time after which you will not continue if validation is still incomplete, and a data error threshold, such as more than 0.5% record count variance, that automatically initiates reversion to your legacy system.
Step 3. Rehearse the cutover and confirm readiness
Running your data migration cutover plan once in production without a rehearsal is the fastest way to discover gaps at the worst possible time. A dry run forces every team member to execute their assigned tasks against real timing constraints, surfaces hidden dependencies, and gives your rollback procedures a real test before they actually matter.
One rehearsal catches more issues than three extra weeks of planning.
Run a dry-run cutover
Schedule your dry run at least two weeks before go-live so you have time to update the runbook based on what breaks. Use a full copy of your production data, not a sample, and time every task block. If your runbook estimates 60 minutes for the data load and it takes 95, your maintenance window calculation is wrong and needs to be corrected before the real event.
Document every deviation from the runbook during the dry run. Each gap becomes a corrective action item with an owner and a due date.
Confirm readiness with a go/no-go checklist
Your go/no-go checklist is a formal sign-off document that each team lead completes before the production cutover window opens. Do not treat this as a verbal confirmation. Here is a working template:
| Area | Readiness Condition | Owner | Status |
|---|---|---|---|
| Data quality | Final extract validated, zero critical errors | Data lead | |
| Backups | Legacy and staging backups confirmed | IT lead | |
| Team availability | All owners confirmed for cutover window | Project manager | |
| Rollback plan | Triggers and steps reviewed by all leads | Controller |
Step 4. Execute cutover and stabilize the business
When your go/no-go checklist is signed off, your data migration cutover plan moves from preparation into execution. At this point, your role shifts from planner to coordinator. Assign one person as the cutover lead who owns all real-time decisions, keeps the runbook moving, and makes the call if a rollback trigger is hit. Everyone else executes their assigned tasks and reports status back on a single shared channel.
Manage the cutover window in real time
Keep every team member on a live call or chat channel throughout the window. Track task completion against your runbook timestamps and flag any task that runs more than 15 minutes over estimate. Do not wait until the window is at risk to escalate. Here is a status tracking format to use during the window:
| Time Block | Task | Owner | Planned | Actual | Variance |
|---|---|---|---|---|---|
| T+0 | Data load start | Data lead | 60 min | ||
| T+1h | Validation scripts | Controller | 30 min | ||
| T+2h | Integration re-enable | IT lead | 20 min |
The cutover window is not the time to troubleshoot problems in isolation. Surface issues immediately and make decisions as a group.
Stabilize operations after go-live
Once the system is live, shift your focus to business stabilization for the first 48 to 72 hours. Assign a dedicated support resource for each functional area, finance, operations, and IT, to handle user issues before they escalate. Confirm that daily financial processes like invoicing, payments, and reporting are running correctly before closing your cutover support period.
Next steps after cutover
Your data migration cutover plan doesn’t end when the system goes live. The first two weeks post-cutover are where adoption gaps and data issues surface, and how you respond determines whether your ERP investment delivers the ROI you planned for. Schedule a formal post-go-live review at the two-week mark to assess open issues, confirm all integrations are stable, and capture lessons learned from the cutover execution.
Document every issue that surfaced during and after the cutover window. Then prioritize resolution by financial impact, starting with anything that affects your close process, reporting accuracy, or cash flow. Build a 30-day stabilization checklist that tracks each item to closure with an assigned owner and a firm deadline.
If your ERP rollout isn’t delivering the outcomes you expected, Concentrus’s NetSuite and Acumatica ERP experts can assess where the gaps are and build a recovery plan tied directly to measurable ROI milestones.