A NetSuite implementation project plan is the single most important document standing between your ERP investment and a measurable return. Without one, timelines slip, budgets inflate, and the system you paid for ends up collecting dust, or worse, creating more problems than it solves. Yet most midsized companies start their implementation without a structured plan that ties each phase to concrete financial and operational outcomes.
The difference between an ERP project that delivers ROI and one that needs rescuing almost always comes down to planning. Specifically, it comes down to defining clear phases, assigning the right roles, and tracking KPIs that actually matter to your bottom line. At Concentrus, we’ve built and rescued enough NetSuite implementations to know exactly where projects go sideways, and it usually starts in the first 30 days when the project plan either sets the foundation or sets the trap. Our ROI Roadmap™ methodology exists because we’ve seen what happens when implementation planning treats technology as the goal instead of a means to faster closes, stronger margins, and better cash flow.
This guide breaks down each phase of a NetSuite implementation project plan, the roles your team needs to fill, and the KPIs worth tracking at every stage. Whether you’re planning your first implementation or trying to understand where a current one went off track, you’ll walk away with a framework you can put to work immediately.
What a NetSuite implementation project plan includes
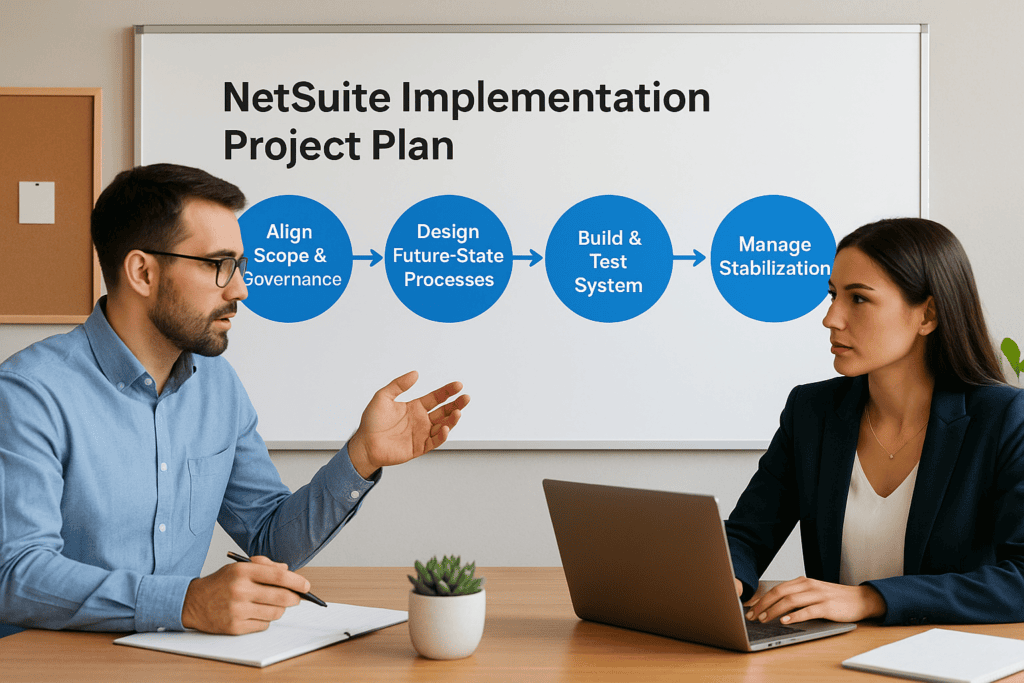
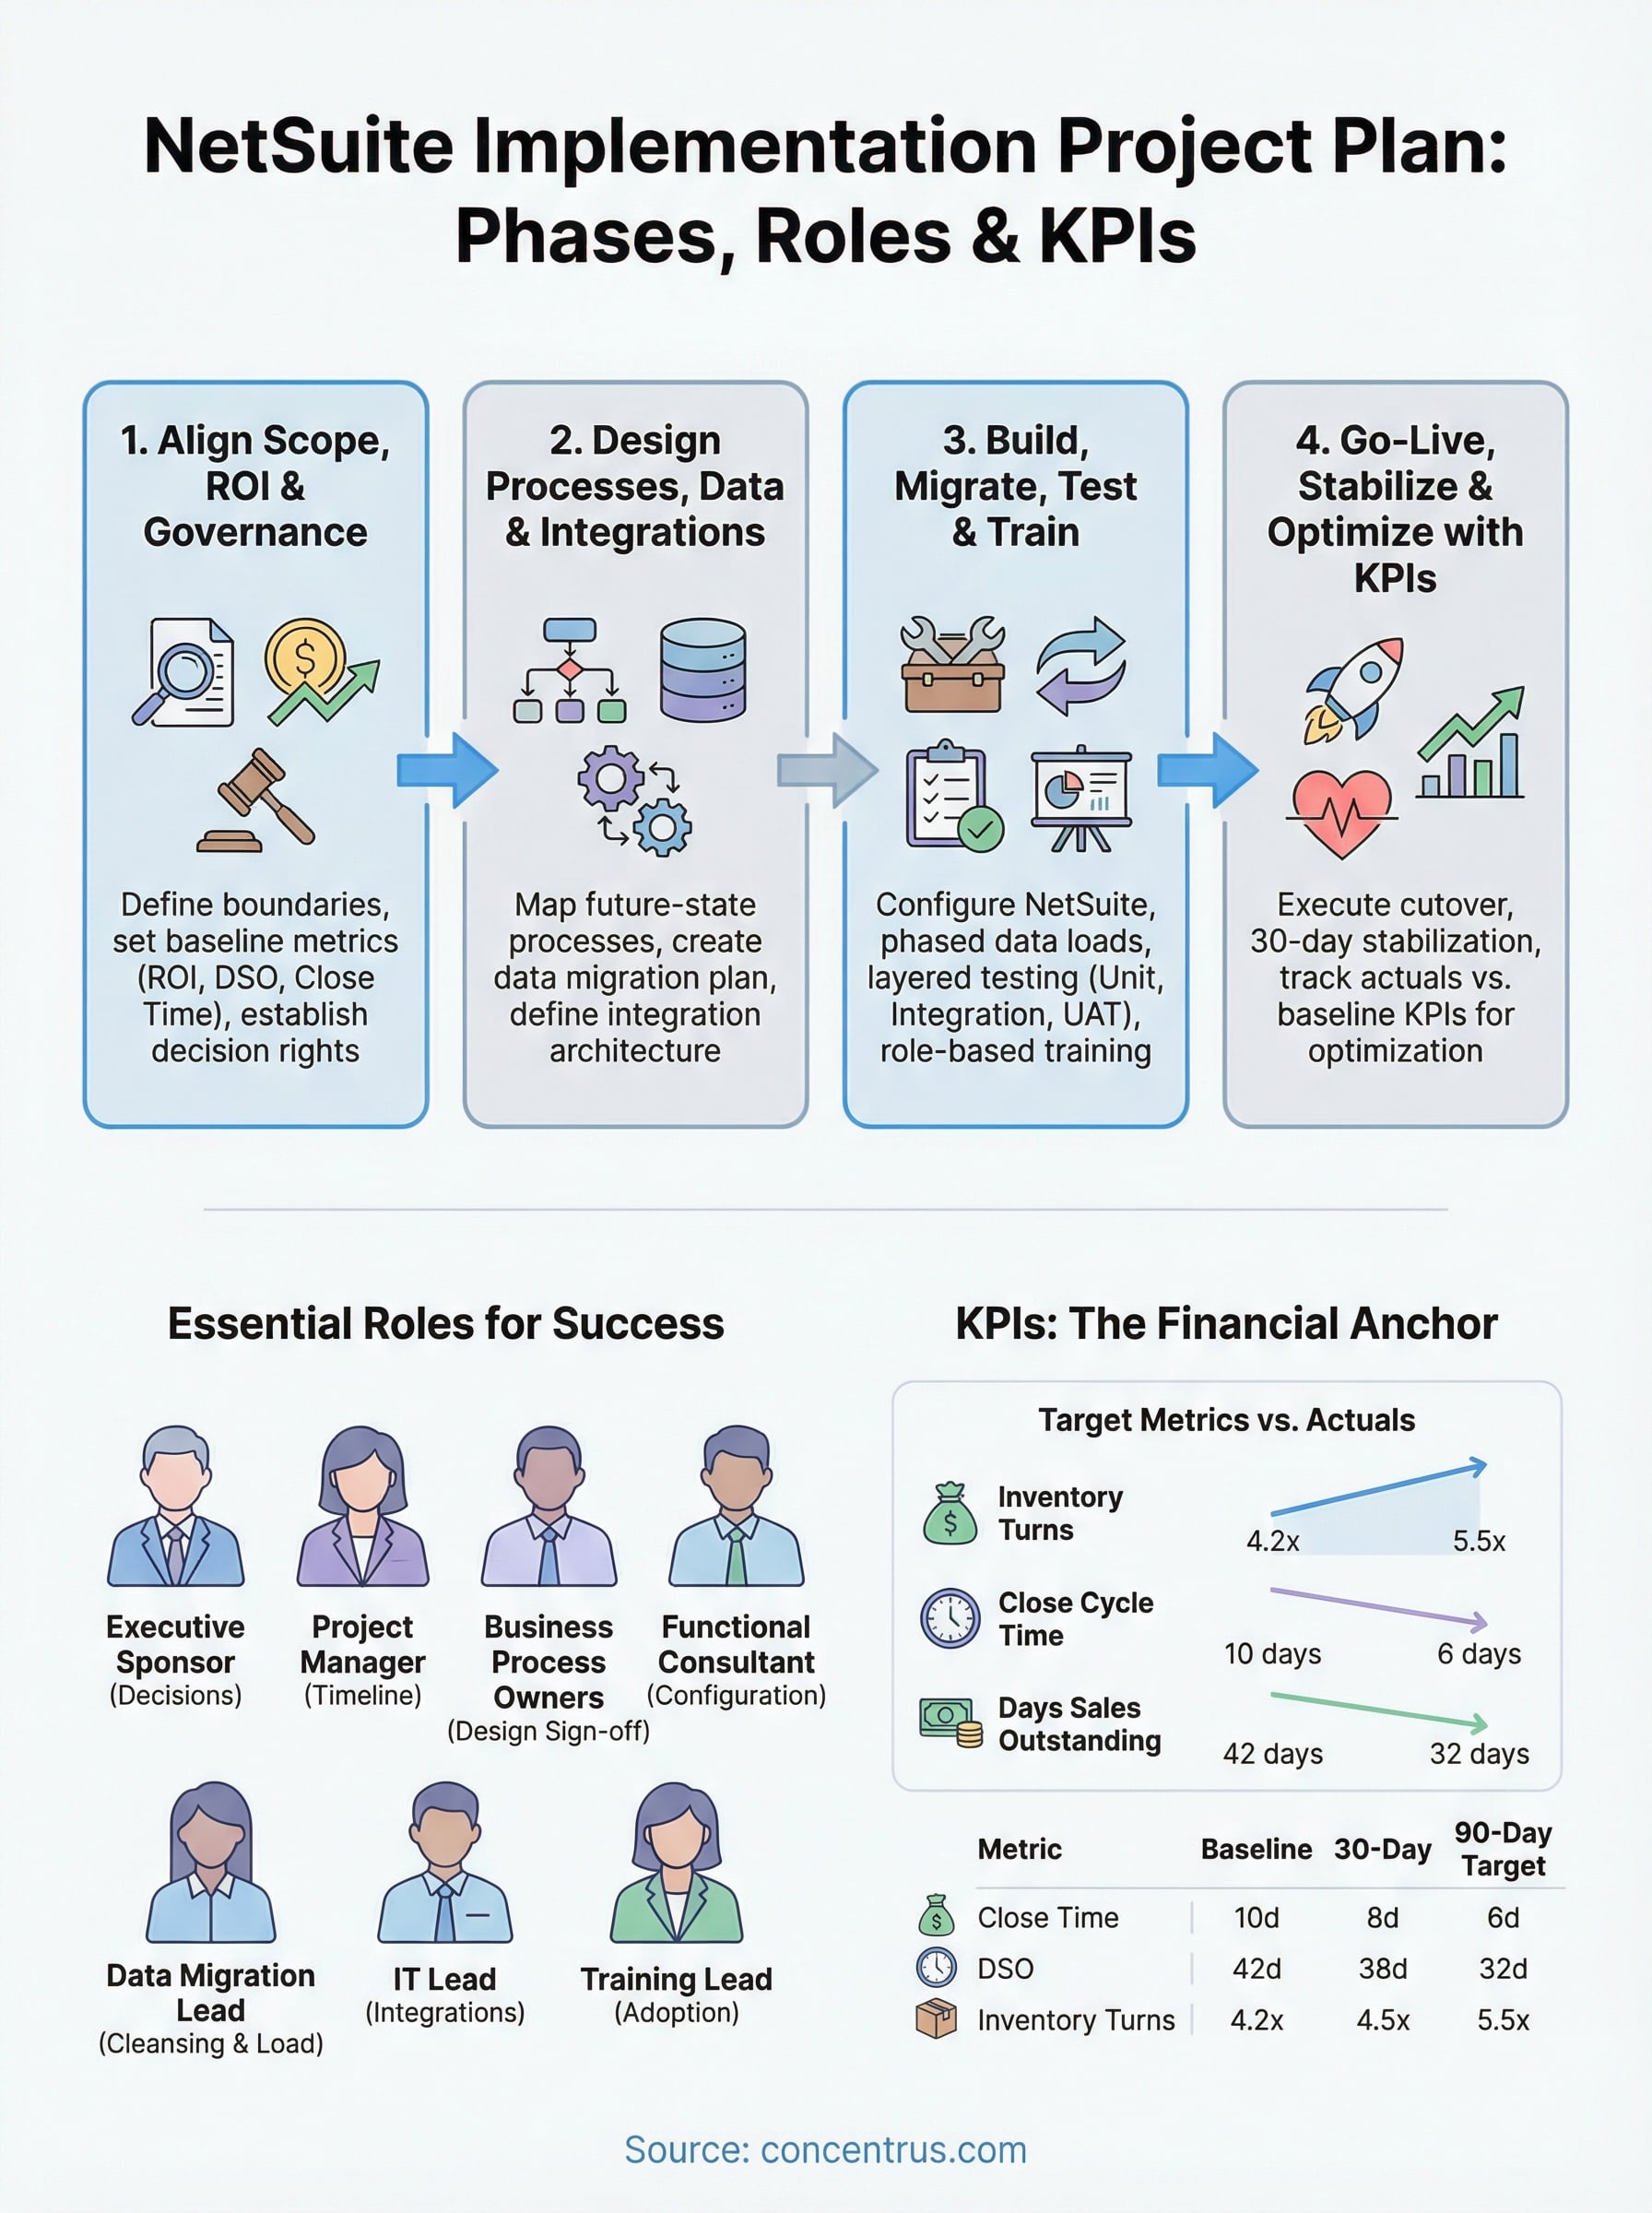
A complete NetSuite implementation project plan is more than a Gantt chart with task assignments. It’s a living document that connects every deliverable to a business outcome your finance team can measure. At minimum, it needs to address four dimensions: scope and governance, process and data design, build and testing, and go-live with post-launch optimization. Miss any one of these, and you create gaps that compound into costly delays and rework that nobody budgeted for.
A project plan that doesn’t define what success looks like in financial terms before day one is a plan built for failure.
The core components every plan needs
Your plan should include six foundational elements regardless of your company size, industry, or the complexity of your NetSuite configuration. Think of these as the structural load-bearing elements of the project. Remove one and the entire structure weakens, usually at the worst possible moment, like three weeks before your planned go-live date.
| Component | What It Covers |
|---|---|
| Scope definition | Modules, integrations, legal entities, and what is explicitly out of scope |
| ROI goals and KPIs | Target metrics like days sales outstanding, close cycle time, and inventory turns |
| Governance model | Decision rights, escalation paths, and executive sponsor accountability |
| Data migration plan | Source systems, data cleansing rules, validation checkpoints, and cutover dates |
| Testing strategy | Unit, integration, user acceptance, and parallel testing protocols |
| Training and change management | Role-based training schedules, adoption tracking, and documentation standards |
Each of these components needs an owner, a timeline, and a definition of done. Without that specificity, components become checkbox items that get marked complete before they’re actually finished, and the cost of catching that mistake late is always higher than the cost of getting it right the first time.
Roles you need to define before kickoff
One of the most common reasons a NetSuite project stalls or exceeds budget is ambiguous role ownership. Your project plan needs to name individuals, not just job titles, for each of the following responsibilities:
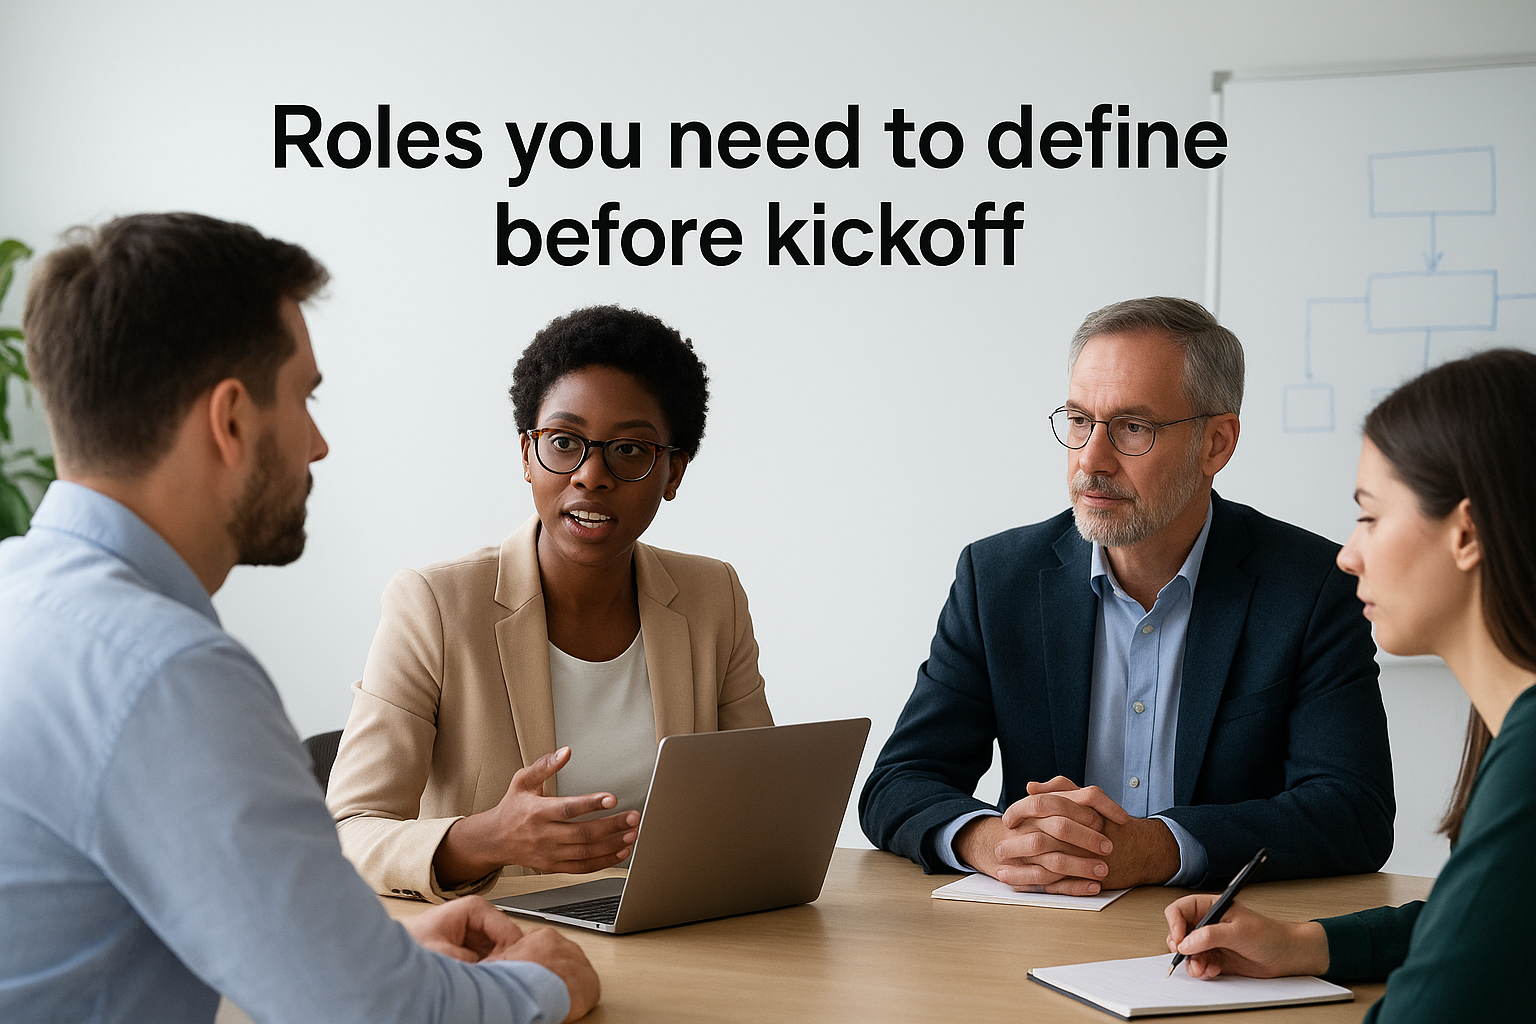
- Executive Sponsor: Makes final decisions on scope changes and resource allocation
- Project Manager: Owns the overall timeline, risk log, and stakeholder communication
- Business Process Owners: Represent each functional area (finance, operations, warehouse) and sign off on process design
- NetSuite Functional Consultant: Configures the system to match your approved process designs
- Data Migration Lead: Owns extraction, cleansing, and load validation for all legacy data
- IT Lead: Manages integrations, user provisioning, and infrastructure requirements
- Training Lead: Builds and delivers role-based training before go-live
Assigning named individuals to each role early prevents the single biggest source of project delays: waiting for someone to make a decision because no one was ever told it was their decision to make.
How KPIs fit into the plan structure
Your KPI framework should not be an afterthought attached at the end of the project. Build it in at the planning stage by linking each module and process change to a specific, measurable improvement. For example, if you’re implementing the Accounts Receivable module, your plan should state the current days sales outstanding and define the target state after go-live. That approach gives every configuration decision a financial anchor, and it gives your team a concrete reason to stay engaged throughout the entire project lifecycle.
Step 1. Align scope, ROI goals, and governance
Step one of your NetSuite implementation project plan is the phase most teams rush through to get to the work of configuration. That instinct costs money. Every undefined scope element, every missing ROI target, and every unclear decision-right becomes a change order or a delay later in the project. Spending two to three focused weeks on alignment at the start saves far more time than it takes.
The scope you fail to define in week one becomes the scope you fight over in week ten.
Define scope with explicit boundaries
Your scope document needs to go beyond listing modules. For each module, state which processes it covers, which legal entities it applies to, and what is explicitly excluded. For example, if you’re implementing the Procurement module, your scope document should specify whether vendor approval workflows are included or deferred to a later phase. That level of specificity prevents the most common and expensive form of scope creep: assumptions.
Use a scope boundary table to make this concrete and shareable with your steering committee:
| Area | In Scope | Out of Scope |
|---|---|---|
| Finance | AP, AR, GL, Fixed Assets | Budgeting (Phase 2) |
| Procurement | PO creation, vendor management | Vendor portal |
| Reporting | Standard NetSuite dashboards | Custom KPI dashboards (Phase 2) |
Set ROI targets before configuration begins
Before your team writes a single configuration requirement, document your baseline metrics for each process area the implementation will touch. If you’re targeting a faster financial close, record your current average close cycle time. If you’re targeting improved inventory turns, capture the current rate. These numbers become your success criteria and give every configuration decision a financial filter rather than a preference-based argument.
Establish your governance model
Your governance model defines who makes decisions when disagreements arise, and they will arise. Name your executive sponsor, define the escalation path, and set a standing cadence for steering committee reviews. Without this structure, decisions that take 15 minutes in a meeting take three weeks over email, and your timeline absorbs every bit of that delay.
Step 2. Design processes, data, and integrations
Step two is where your netsuite implementation project plan moves from strategy into the detailed work of designing what the system will actually do. This phase produces the three most referenced documents throughout the rest of your project: your future-state process maps, your data migration plan, and your integration architecture. Get these right, and your build phase moves fast. Skip the detail here, and you’ll spend that time reworking configurations that were built on assumptions instead of approved designs.
Map your future-state processes
Your process maps need to show how work will flow through NetSuite, not how it flows today. Start with each in-scope module and document the steps, system triggers, approvals, and exception paths for every process. This is not a documentation exercise for its own sake. Every process decision here becomes a configuration requirement your consultant uses to build the system. Vague process maps produce vague configurations that require expensive rework.

Document exceptions and edge cases during process design, not during user acceptance testing.
Use a simple process template for each workflow:
| Field | Detail |
|---|---|
| Process name | e.g., Vendor Invoice Approval |
| Trigger | e.g., Invoice received via email |
| Steps | List each action and system event in sequence |
| Approver(s) | Named roles responsible for each approval step |
| Exception path | What happens when approval is rejected or delayed |
Build your data migration plan
Your data migration plan needs to identify every source system, the data objects you’re migrating, and the cleansing rules that apply before any record moves into NetSuite. For each object, define who owns extraction, who validates cleanliness, and what the acceptance criteria are before the load runs.
Define your integration architecture
Every integration your business requires, whether that’s your e-commerce platform, shipping tools, or payroll system, needs a design document before build begins. Specify the direction of data flow, the trigger for each sync, the frequency, and the error handling protocol. Leaving integration design to the build phase creates the single most common source of go-live delays on NetSuite projects.
Step 3. Build, migrate, test, and train
Step three is where your NetSuite implementation project plan becomes visible. Your consultant starts configuring modules, your data migration lead begins extractions, and your training team builds the materials your users will rely on after go-live. This phase is the most resource-intensive stretch of the project, and the two biggest risks here are running activities in the wrong sequence and treating testing as a single event instead of a layered process.
Configure the system against approved designs
Your functional consultant should build each module configuration directly from the approved process maps your team produced in step two. Every workflow, approval rule, and custom field should trace back to a documented requirement. If a configuration decision isn’t anchored to an approved design, flag it immediately. Undocumented changes made during the build phase are the primary reason user acceptance testing fails on the first pass and creates weeks of rework nobody planned for.
Build only what your approved process designs specify, and document every deviation in your change log before it goes into the system.
Run your data migration in phases
Don’t wait until the final weeks of your project to validate migration data. Run at least two practice loads into your NetSuite sandbox environment well before cutover. Each practice load should test your cleansing rules, validate record counts against source system totals, and surface transformation errors while you still have time to fix them. Use this checklist for each practice migration run:
- Confirm source record counts match NetSuite load totals
- Validate field mappings for each object type (customers, vendors, open transactions)
- Test transactional history cutoff dates against your go-live cutover plan
- Document and resolve every data exception before the next load cycle
Test in layers, then train by role
Your testing sequence matters as much as your testing coverage. Start with unit testing on individual configurations, move to integration testing across connected modules, then run user acceptance testing with the actual employees who will use the system daily. Each layer catches different failure types, and compressing them into a single testing sprint guarantees that critical issues reach go-live undetected.
Training should follow the same logic. Build role-based training sessions tied to each user’s specific workflows rather than delivering generic system walkthroughs. A warehouse associate and a financial controller use NetSuite very differently, and training that ignores that distinction produces low adoption rates that undercut the ROI targets you set in step one.
Step 4. Go-live, stabilize, and optimize with KPIs
The final phase of your netsuite implementation project plan is not the finish line. It is the beginning of the period where your ERP investment either starts delivering returns or starts requiring more repair work. Go-live day gets the most attention, but the 30 to 60 days following launch determine whether the ROI targets you defined in step one actually show up in your financial results.
Execute your cutover and go-live
Your cutover plan needs to define a precise sequence of actions: freeze legacy system transactions, run your final data migration load, validate record counts, enable user access, and confirm that every integration is live and syncing correctly. Assign each step a named owner and a completion window. If any step fails its validation check, your plan should include a rollback decision point and a clear owner for that call.
A go-live without a documented rollback plan is a risk your business cannot afford to absorb.
Stabilize in the first 30 days
During the 30-day stabilization window, adoption problems and configuration gaps surface under real transaction volume. Set a daily triage cadence during week one where your project team reviews open issues, categorizes them by severity, and commits to resolution timelines. Separate cosmetic issues from functional blockers so your team focuses energy on what actually stops work from getting done.
Assign a stabilization lead who owns the issue log and communicates status updates to your executive sponsor on a weekly basis. This single role prevents the post-launch breakdown that derails KPI progress before it starts.
Track KPIs against your baseline
Return to the baseline metrics you captured in step one and compare them against your post-go-live actuals at 30, 60, and 90 days. Use a tracking table your finance team reviews each period:
| KPI | Baseline | 30-Day Actual | 60-Day Actual | Target |
|---|---|---|---|---|
| Close cycle time | 10 days | 8 days | 7 days | 6 days |
| Days sales outstanding | 42 days | 38 days | 35 days | 32 days |
| Inventory turns | 4.2x | 4.5x | 4.8x | 5.5x |
Gaps between actuals and targets signal exactly where your team needs to focus optimization effort in the next phase.
Conclusion
A strong netsuite implementation project plan doesn’t just keep your project on schedule. It connects every phase, role, and decision to the financial outcomes your business actually needs from this investment.
You now have a framework that covers scope alignment, process design, build and testing, and post-launch KPI tracking. Each step builds directly on the last, and each role you define early removes the bottlenecks that derail projects before they reach go-live. The difference between an implementation that delivers ROI and one that requires rescue almost always traces back to the quality of the plan built on day one.
If you want a partner who ties every phase of your NetSuite project to measurable financial results, talk to the ERP and ROI experts at Concentrus to see how the ROI Roadmap™ methodology can anchor your implementation to the metrics your finance team cares about from start to finish.