
Moving your business data from one system to another, whether during an ERP implementation, system upgrade, or platform consolidation, carries real financial risk. A data migration plan template gives you the structured framework to avoid costly errors, missed deadlines, and the operational chaos that derails so many projects.
At Concentrus, we’ve guided midsized companies through hundreds of NetSuite and Acumatica implementations. The difference between a smooth go-live and a drawn-out recovery effort often comes down to how well the migration was planned from day one. Without a documented process, teams scramble, data gets corrupted, and finance leaders lose visibility right when they need it most.
This guide walks you through a practical, step-by-step data migration plan template, covering the roles, checkpoints, and strategies that protect your ROI and keep your project on track. Whether you’re planning a new ERP rollout or rescuing a stalled implementation, you’ll find a framework you can adapt to your organization’s specific needs.
What your data migration plan template must cover
Your data migration plan template needs to function as both a project roadmap and a risk management tool. It should document every decision point, define clear ownership for each task, and establish measurable checkpoints that prevent small problems from becoming expensive failures. A well-structured template keeps your finance team, IT department, and implementation partner aligned on priorities, timelines, and quality standards throughout the entire migration.
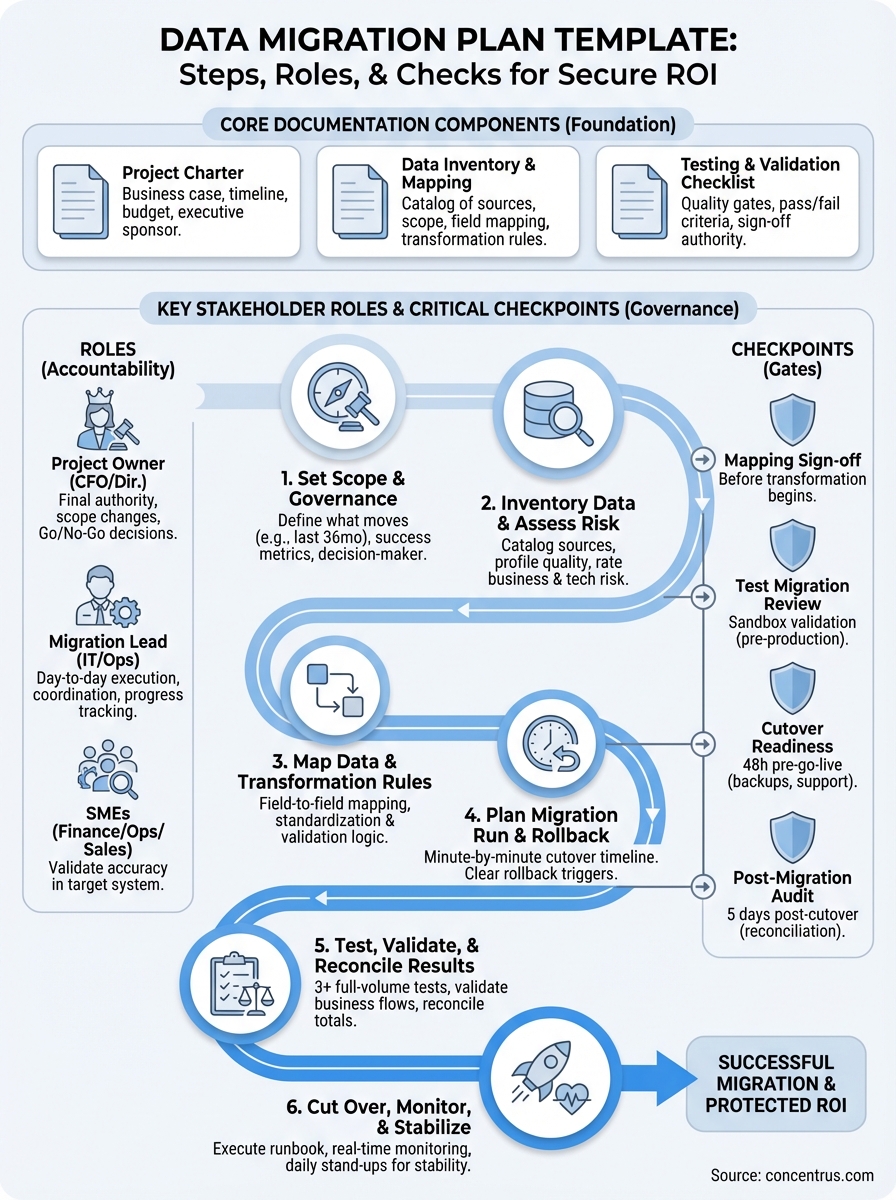
Core documentation components
Every effective data migration plan template includes three foundational documents that guide execution. First, you need a project charter that defines the business case, budget, timeline, and executive sponsor. This document answers why you’re migrating data and what success looks like in financial terms, such as faster monthly close cycles or improved inventory accuracy.
Second, you need a data inventory and mapping spreadsheet that catalogs every source system, database table, field, and relationship you’re moving. This spreadsheet becomes your single source of truth for scope decisions. Third, you need a testing and validation checklist that outlines every quality gate, from initial data profiling through post-cutover reconciliation. Your template should include space for actual versus expected results, pass/fail criteria, and sign-off authority for each checkpoint.
A comprehensive data migration plan template eliminates guesswork by documenting decisions before pressure mounts during go-live week.
Key stakeholder roles and responsibilities
Your template must assign specific accountability for each phase of the migration. Start by naming the project owner, typically a CFO or Finance Director, who has final authority over scope changes and go/no-go decisions. Designate a migration lead from your IT or operations team who manages the day-to-day execution, coordinates with vendors, and tracks progress against milestones.

You also need to define who validates data accuracy in the target system. Finance leaders should assign subject matter experts from accounting, operations, and sales to review migrated records in their domains. Without clear ownership, teams assume someone else is checking the data, and errors slip through. Your template should include a RACI matrix (Responsible, Accountable, Consulted, Informed) that maps every migration task to a named individual.
Critical checkpoints and gates
Build mandatory approval gates into your data migration plan template at four critical junctures. First, require sign-off on the data mapping document before any transformation work begins. Second, establish a test migration review where stakeholders validate results in a sandbox environment before touching production data. Third, create a cutover readiness checkpoint 48 hours before go-live, where you verify that backup procedures, rollback plans, and support coverage are in place.
Finally, schedule a post-migration audit within five business days of cutover to catch reconciliation issues while you still have parallel systems available. Your template should include criteria for passing each gate and a documented escalation path when problems arise. These checkpoints protect your investment by forcing teams to pause and validate rather than rush forward on hope.
Step 1. Set scope, success metrics, and governance
Your first step locks in what data you’re moving, how you’ll measure success, and who makes binding decisions when conflicts arise. This foundational work prevents scope creep and sets clear expectations for every stakeholder before you touch a single record. Without documented boundaries, your migration expands to include every historical transaction, unused custom field, and archived report, inflating costs and delaying your go-live by months.
Define what data moves (and what doesn’t)
Start by cataloging every data type your business relies on: customer records, vendor details, product catalogs, transaction history, pricing rules, and financial balances. Then make hard decisions about what you’re leaving behind. Most midsized companies migrate 24 to 36 months of transactional history rather than everything since inception. Older data typically moves to a read-only archive that you can reference if needed.
Document these scope decisions in your data migration plan template using a simple table format:
| Data Type | Include | Exclude | Justification |
|---|---|---|---|
| Customer Master | All active records | Duplicate/test accounts | Operational necessity |
| Sales Orders | Last 36 months | Prior years | Reporting requirement |
| Product SKUs | All current items | Discontinued pre-2023 | Inventory management |
This table becomes your scope reference document that you share with every team member and vendor involved in the migration.
Establish measurable success criteria
Define specific, quantifiable outcomes that prove your migration worked. Instead of vague goals like “accurate data,” set targets such as “99.5% vendor payment terms match between source and target systems” or “all open AR balances reconcile within $500.” Your success metrics should tie directly to business processes that depend on data quality, such as order fulfillment accuracy rates or days sales outstanding calculations.
Success metrics transform your data migration from a technical exercise into a measurable business outcome that protects your ROI.
Create the governance structure
Name the decision-maker who resolves disputes when teams disagree on data mapping choices or cutover timing. This person, typically your CFO or Finance Director, has final authority to approve scope changes, allocate additional budget, or delay go-live if quality standards aren’t met. Establish a weekly steering committee meeting where your migration lead reports progress, flags risks, and requests decisions on issues that block forward movement.
Step 2. Inventory data and assess quality and risk
Before you move a single record, you need a complete picture of what data exists, where it lives, and what condition it’s in. This inventory phase reveals the hidden problems that derail migrations: duplicate customer records, inconsistent product codes, orphaned transactions, and fields that contain free-text garbage instead of structured values. Your data migration plan template should include a detailed inventory spreadsheet that documents every source system, table, field name, data type, and volume count.
Catalog every data source and object
List every application that stores business data you’ll need in your new ERP system. Include obvious sources like your current accounting software and CRM, but also spreadsheets, Access databases, and standalone tools that different departments built over the years. For each source, document the connection method (API, database export, CSV file), estimated record counts, and the last time someone updated that data.
Create a table in your data migration plan template that captures this information:
| Source System | Data Object | Record Count | Last Updated | Owner |
|---|---|---|---|---|
| Legacy ERP | Chart of Accounts | 450 | Active | Finance |
| QuickBooks | Vendor Master | 2,340 | Active | AP Team |
| Excel | Product Pricing | 1,200 | Monthly | Sales Ops |
Run data quality profiling
Pull samples from each source system and run basic quality checks that expose problems before migration starts. Look for missing required fields, values outside expected ranges, duplicate records with slightly different spellings, and orphaned child records that reference deleted parent records. Document the percentage of clean records for each critical data object so you know how much cleanup work you’re facing.
Profiling your source data early gives you realistic timelines and prevents the shock of discovering quality problems during go-live week.
Assess business impact and technical risk
Rate each data object on two dimensions: business criticality and technical complexity. Customer master records and open invoices carry high business risk because errors directly affect revenue and cash flow. Historical transactions from five years ago carry low business risk. Complex multi-level bills of material or custom pricing matrices carry high technical risk because transformation logic can fail in subtle ways. Your risk assessment determines where you invest extra validation effort and which data objects you migrate first in your testing cycles.
Step 3. Map data and define transformation rules
Data mapping transforms your inventory into a concrete execution plan by defining exactly where each field from your source system lands in your target ERP. This step documents the transformation logic you’ll apply to convert, clean, and standardize data during the migration. Your data migration plan template needs a field-by-field mapping spreadsheet that serves as the blueprint your technical team follows when they write extraction and loading scripts.

Build your field-level mapping document
Create a spreadsheet that lists every source field alongside its target destination, data type, and any conversion rules you need to apply. Include columns for the source system name, source table, source field name, target system, target table, target field name, and transformation notes. This mapping document becomes your shared reference between business users who understand the data and technical resources who execute the migration.
Here’s the structure your mapping spreadsheet should follow:
| Source System | Source Field | Target System | Target Field | Transformation Rule | Owner |
|---|---|---|---|---|---|
| Legacy ERP | CUST_NUM | NetSuite | entityid | Remove leading zeros | Finance |
| QuickBooks | Vendor_Name | NetSuite | companyname | Title case, trim spaces | AP Team |
| Excel | Prod_Price | NetSuite | pricing.price | Round to 2 decimals | Sales Ops |
Document every exception and edge case in your transformation notes. If your source system uses “Y/N” for boolean fields but your target expects “true/false,” capture that rule. When your legacy product codes contain special characters that your new ERP restricts, define how you’ll handle those conversions.
Document transformation and business rules
Write out the specific business logic you’ll apply during migration in plain language that your finance team can validate. For example, if you’re consolidating three regional customer databases, define which record wins when you find duplicates. When you’re mapping chart of accounts, document how you’ll roll up old account segments into your new structure. Your transformation rules should address data standardization (formatting phone numbers consistently), enrichment (adding default values for missing fields), and deduplication (merging records that represent the same entity).
Clear transformation rules prevent confusion during testing and give your team an objective standard for validating migration results.
Include validation rules that define acceptable values for each field. If your payment terms must match a specific list, document that constraint. When customer credit limits require approval above certain thresholds, capture that business rule so you can verify it after migration.
Step 4. Plan the migration run and rollback
Your migration run plan defines the exact sequence of technical steps you’ll execute during cutover weekend, who performs each task, and how long each activity takes. This operational blueprint eliminates guesswork when you’re working under pressure with limited time to move production data. Your data migration plan template should include a detailed cutover timeline that accounts for data extraction, transformation processing time, loading, validation checks, and rollback decision points.
Define your cutover window and sequence
Schedule your migration during a period of minimal business activity, typically a weekend or holiday break when transaction volumes drop to near zero. Calculate the total time you need by running full-volume test migrations and adding 50% buffer for unexpected delays. Your cutover window starts when you freeze the source system and ends when users can begin working in the new ERP.
Create a minute-by-minute runbook that lists every technical step:
| Time | Task | Owner | Duration | Go/No-Go |
|---|---|---|---|---|
| Fri 6:00 PM | Freeze source system | IT Lead | 15 min | Checkpoint |
| Fri 6:15 PM | Extract customer data | Migration Team | 2 hours | Continue |
| Fri 8:15 PM | Transform and load | Migration Team | 3 hours | Continue |
| Fri 11:15 PM | Validate critical records | Finance | 1 hour | Checkpoint |
Document your rollback procedure
Build a step-by-step rollback plan that you execute if validation fails or critical errors surface during cutover. This procedure defines the exact triggers that force you to abort the migration, how you restore the source system to operation, and how you communicate the delay to stakeholders. Your rollback plan protects your business continuity by ensuring you always have a working system.
A documented rollback procedure removes the emotional pressure from go/no-go decisions by establishing objective criteria before cutover begins.
Include database restore commands, system configuration reversions, and user communication templates in your rollback documentation. Test your rollback procedure during dress rehearsals to verify that you can actually reverse course within your planned recovery time objective.
Step 5. Test, validate, and reconcile results
Testing transforms your data migration plan template from theory into proven execution by validating that your transformation logic works correctly and your target system contains accurate, usable data. You run multiple test cycles in a non-production environment before you touch your live system, catching errors when fixes cost hours instead of days. This phase gives your finance team confidence that the data they’ll rely on for reporting, forecasting, and daily operations matches what they had in the source system.

Run full-volume test migrations
Execute at least three complete test migrations using production-volume data extracts in a sandbox environment. Your first test uncovers major transformation failures and mapping errors. The second test validates your fixes and reveals edge cases your team missed initially. Your third test proves that your migration process runs reliably under realistic conditions. Record the actual duration of each test run so you can refine your cutover timeline and identify bottlenecks that need optimization.
Test migrations expose the problems that would otherwise surface during go-live when you have no time to fix them properly.
Track every issue you discover in a defect log that captures the problem description, affected records, root cause, fix applied, and retest status. Your data migration plan template should include a simple defect tracking table that keeps everyone aligned on what’s broken and what’s resolved.
Validate business-critical workflows
Ask subject matter experts from finance, sales, and operations to execute real business processes in your test environment using migrated data. Have your AP team process vendor payments, your sales team generate quotes, and your finance team run month-end close procedures. They should verify that customer credit limits apply correctly, product pricing loads accurately, and open balances match expectations. Document which scenarios passed and which failed so you know exactly what works before cutover.
Reconcile totals and record counts
Build a reconciliation checklist that compares key metrics between source and target systems:
| Data Object | Source Count | Target Count | Variance | Status |
|---|---|---|---|---|
| Active Customers | 2,340 | 2,338 | -2 | Review |
| Open AR Balance | $487,230 | $487,230 | $0 | Pass |
| Product SKUs | 1,200 | 1,200 | 0 | Pass |
Investigate any variance that exceeds your acceptable tolerance, typically 0.1% for financial data and 1% for transactional records.
Step 6. Cut over, monitor, and stabilize operations
Your cutover marks the moment you switch production traffic to the new ERP system, making it the single source of truth for all business operations. This final step requires intense focus from your entire team as you execute your pre-planned sequence, watch for unexpected problems, and make rapid decisions to keep operations running. Your data migration plan template should include a post-cutover monitoring protocol that defines which metrics you track hourly versus daily and establishes clear escalation paths when issues emerge.
Execute your cutover checklist
Follow your runbook step by step, marking each completed task and recording actual completion times against your estimates. Start by announcing the cutover to all users through your established communication channels, confirming that everyone understands the source system is now read-only. Your migration lead should maintain a live status log that documents each major milestone, any deviations from the plan, and decisions made during execution.
Use this checklist format during your cutover:
| Task | Scheduled | Completed | Status | Notes |
|---|---|---|---|---|
| Announce system freeze | 6:00 PM | 6:02 PM | Done | Email sent |
| Extract final data | 6:15 PM | 6:18 PM | Done | 2.3M records |
| Run transformation | 8:15 PM | 8:22 PM | Done | Warnings reviewed |
| Load to production | 10:00 PM | 10:45 PM | Done | 15 min delay |
Monitor system performance in real time
Assign team members to watch specific system indicators during your first 48 hours of production operation. Track user login rates, transaction processing times, batch job completion, and any error messages that appear in system logs. Your finance team should verify that critical processes like order entry, invoice generation, and payment processing work correctly under real business volume.
Real-time monitoring catches performance degradation and data quality issues before they cascade into operational failures.
Stabilize operations and close the project
Schedule daily stand-up meetings for the first week after cutover where each department reports problems they’ve encountered, workarounds they’ve implemented, and questions that need immediate answers. Document every issue in your defect tracking system, prioritize fixes based on business impact, and deploy corrections through your standard change management process. Your migration project closes when all critical defects are resolved, users complete training on the new system, and your CFO signs off that financial reporting runs accurately from migrated data.
Next steps for a safe migration
Your data migration plan template gives you the documented framework to move business data without sacrificing accuracy, timeline, or budget. By following these six steps, you establish clear ownership, test thoroughly before cutover, and build in validation checkpoints that catch errors when they’re still cheap to fix. Every migration carries risk, but a structured approach transforms that risk from unpredictable chaos into manageable, measured progress.
At Concentrus, we’ve guided hundreds of midsized companies through NetSuite and Acumatica implementations using our proven ROI Roadmap™ methodology. Our ERP experts understand that successful migrations require more than technical execution. They demand financial accountability, clear communication, and a plan that protects your investment from day one. If you’re planning an ERP implementation or need to rescue a stalled project, schedule a consultation with our team to discuss how we build guaranteed ROI into every migration step.