

Every ERP implementation hinges on one make-or-break phase: moving your existing data into the new system. A thorough data migration checklist is the difference between a smooth go-live and months of cleanup, reconciliation headaches, and frustrated teams. For CFOs overseeing NetSuite or Acumatica projects, getting this right directly impacts your ROI timeline.
Data migration failures don’t just delay projects, they erode confidence in the entire ERP investment. Duplicate records, missing historical data, broken integrations, and compliance gaps can turn a promising implementation into a rescue situation. The stakes climb even higher when financial data accuracy affects reporting, audits, and strategic decision-making. Without a structured approach, teams often discover critical issues only after go-live, when fixes cost significantly more in time, money, and credibility.
This guide walks you through a complete framework to plan, execute, and validate your data migration. At Concentrus, we’ve refined this process across hundreds of NetSuite and Acumatica implementations, building data migration into our ROI Roadmap™ methodology to ensure measurable outcomes from day one. Whether you’re starting a new ERP project or rescuing a troubled one, you’ll find actionable steps to protect your investment and accelerate time-to-value.
What a data migration checklist covers
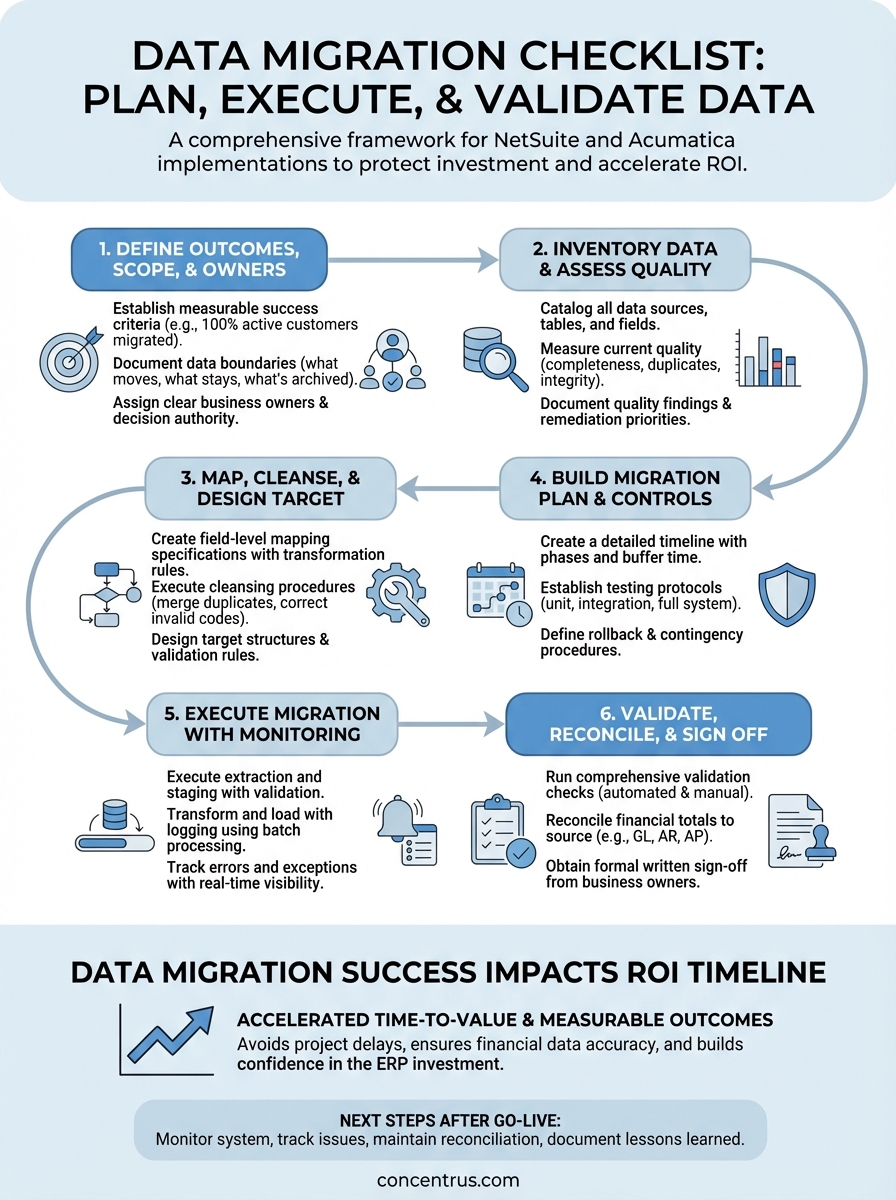
A comprehensive data migration checklist breaks the process into six distinct phases that protect your financial data integrity while keeping your ERP project on track. Each phase includes specific deliverables, validation gates, and clear accountability assignments to prevent the common pitfalls that derail implementations. You need a framework that addresses not just the technical movement of data, but the business rules, quality standards, and compliance requirements that make that data usable.
Core phases and deliverables
Your checklist should structure the migration around planning, execution, and validation milestones that tie directly to your project timeline. The planning phase establishes what data moves, who owns each dataset, and what success looks like in measurable terms. Execution covers the actual extraction, transformation, and loading of data, while validation ensures accuracy before and after go-live.
Each phase produces specific artifacts that become your audit trail and reference documentation. Planning deliverables include data dictionaries, mapping specifications, and quality standards. Execution generates test results, error logs, and reconciliation reports. Validation creates sign-off documentation, exception reports, and fallback procedures.
A well-structured checklist transforms data migration from a technical task into a controlled business process with measurable quality gates.
The best checklists include decision points and escalation paths for when you encounter data quality issues, integration conflicts, or scope changes. You need clear criteria for when to proceed, when to pause for remediation, and when to involve executive stakeholders in risk decisions.
Key stakeholders and accountability
Every item on your checklist should assign specific ownership to avoid the assumption that IT handles everything. Finance teams own chart of accounts mapping, AP/AR historical balances, and period-end reconciliation requirements. Operations owns customer records, vendor files, and inventory data. Sales owns opportunity histories and forecasting data.
Your checklist documents approval authority at each validation gate. Who signs off on data mapping specifications? Who confirms test migration results? Who authorizes the final production cutover? These decisions carry financial and operational consequences, so accountability must sit with business leaders who understand the downstream impact.
Documentation and validation requirements
Strong checklists mandate documentation standards that survive long after your implementation team moves on. You need field-level mapping specifications that explain transformation logic, business rules that govern data cleansing decisions, and exception handling procedures for edge cases that don’t fit standard patterns.
Validation requirements should include both automated and manual checks across multiple dimensions. Automated scripts verify record counts, sum totals, and referential integrity. Manual reviews confirm that complex transactions reconstruct correctly, multi-entity consolidations balance, and regulatory reporting requirements remain intact.
Your checklist should specify acceptable error thresholds and remediation timelines for different data types. Critical financial data might require 100% accuracy before proceeding, while reference data like product descriptions might tolerate small error rates with documented exceptions. Testing protocols need to cover not just the happy path, but the edge cases and exception scenarios that often break in production.
The framework includes rollback procedures and contingency plans if validation reveals issues post-migration. You need documented steps to revert to legacy systems, criteria for when rollback becomes necessary, and communication protocols to manage stakeholder expectations during recovery scenarios.
Step 1. Define outcomes, scope, and owners
Before you touch a single data field, you need crystal-clear agreement on what success looks like and who owns each piece of the migration puzzle. This first step prevents the scope creep and accountability gaps that turn straightforward migrations into extended rescue projects. Your data migration checklist starts here because every subsequent decision flows from these foundational definitions.
Establish measurable success criteria
You must define specific, quantifiable outcomes that tie directly to your ERP investment goals. If your ROI depends on closing books five days faster, your success criteria include migrating complete period-end data that supports automated reconciliation. If you need real-time inventory visibility, you measure successful migration by achieving 100% accuracy in on-hand quantities, locations, and lot traceability.
Document these criteria in concrete terms that anyone can verify. Instead of “migrate all customer data,” specify “migrate 100% of active customer records with complete billing addresses, payment terms, and 24 months of transaction history.” Replace vague goals like “improve data quality” with measurable targets such as “reduce duplicate customer records from 8% to 0% and achieve 100% valid tax classification codes.”
Success criteria must include both technical accuracy metrics and business process outcomes that demonstrate ROI impact.
Document data scope and boundaries
Your scope definition answers three critical questions: which data moves, which stays behind, and which requires transformation. Start by listing every data entity in your current system, then categorize each as migrate-all, migrate-subset, archive-only, or exclude. For example, you might migrate all open AP invoices but only 36 months of closed transactions, while archiving older data in your legacy system for reference.
Define temporal boundaries that align with your financial reporting requirements. Specify cutoff dates for transactional data, determine how many years of history your new system needs for trend analysis, and establish retention policies for archived records. These decisions directly affect migration complexity, storage costs, and system performance.
Assign clear ownership and accountability
Every data entity needs a named business owner who understands both the source data and target requirements. This person validates mapping specifications, approves cleansing rules, and signs off on test results. You cannot delegate financial data ownership to IT alone.
Create a responsibility matrix that documents decision authority for each migration phase:
| Data Domain | Business Owner | Technical Lead | Final Approver |
|---|---|---|---|
| Chart of Accounts | Controller | ERP Admin | CFO |
| Customer Master | Sales Ops Director | CRM Manager | VP Sales |
| Vendor Records | AP Manager | Procurement Lead | Controller |
| Inventory Data | Operations Director | Warehouse Manager | COO |
This structure ensures that technical teams execute the migration while business leaders own the accuracy and usability of the results.
Step 2. Inventory data and assess quality
You cannot migrate what you cannot measure. This step requires systematic documentation of every data source, table, and field in your current systems, combined with honest assessment of quality issues that will affect your new ERP. Most organizations discover that 15-30% of their data requires significant remediation before migration. Your data migration checklist must capture these findings early, when you still have time and budget to address them properly.
Create a complete data inventory
Start by cataloging every data source that feeds your business operations. This includes your primary ERP system, standalone databases, Excel spreadsheets that drive operational processes, integrated applications like CRM or warehouse management, and legacy systems still running critical functions. You need the complete picture before you can prioritize what moves.

Document each data entity with specific technical details: table names, record counts, field definitions, data types, and update frequencies. For a customer master file, note how many total records exist, how many updated in the past 12 months, which fields contain null values, and which external systems reference this data. This inventory becomes your migration planning foundation.
Discovering orphaned databases and shadow systems during this phase prevents last-minute surprises that delay go-live.
Measure current data quality
Run automated quality assessments across your inventory using specific metrics. Calculate completeness rates for required fields, identify duplicate records using matching algorithms, measure format consistency for codes and identifiers, and flag referential integrity breaks where child records lack valid parents. These numbers quantify the remediation work ahead.
Profile your financial data with particular scrutiny. Check for unbalanced transactions, verify that subsidiary ledgers reconcile to the general ledger, identify accounts with unusual activity patterns, and confirm that historical periods closed properly. Quality issues in financial data create audit problems that surface months after migration.
Document quality findings
Create a structured quality report that categorizes issues by severity and business impact:
| Issue Type | Record Count | Business Impact | Remediation Owner |
|---|---|---|---|
| Duplicate customers | 847 | Billing errors, reporting inaccuracy | Sales Operations |
| Missing GL codes | 1,203 | Cannot migrate transactions | Controller |
| Invalid vendor addresses | 412 | Payment processing delays | AP Manager |
| Orphaned inventory records | 2,156 | Valuation errors | Warehouse Manager |
This documentation drives your cleansing priorities and resource allocation for the next phase.
Step 3. Map, cleanse, and design the target
This step transforms your quality assessment into executable specifications that bridge your current data to the new ERP structure. You define exactly how each source field converts to target fields, execute the remediation work identified in your quality assessment, and design the target data architecture that supports your business processes. Your data migration checklist tracks completion of mapping documents, cleansing scripts, and target configuration that together determine whether your migrated data actually works in production.
Create field-level mapping specifications
You need detailed documentation that specifies the transformation logic for every field that moves to your new system. Start with critical entities like chart of accounts, customer master, and vendor files. For each source field, document the target field name, transformation rules, default values for blanks, and validation criteria.
Build mapping specifications that technical and business teams both understand. Your controller must confirm that legacy account 4010-Sales maps to the correct revenue account in NetSuite’s structure, while your technical team needs the exact transformation logic to execute. Document complex mappings that combine multiple source fields or apply conditional logic based on record attributes.
| Source Field | Target Field | Transformation Rule | Validation Check |
|---|---|---|---|
| CUST_TYPE (A/B/C) | Customer Category | A=Retail, B=Wholesale, C=Enterprise | Required, must match list |
| CREDIT_LIM | Credit Limit | Convert to decimal, multiply by 1.15 | Positive number, max 1,000,000 |
| ACCT_CODE | GL Account | Map via lookup table, default to 1200 | Must exist in target COA |
Execute data cleansing procedures
Your quality assessment identified specific remediation tasks that must complete before migration. Assign each cleansing activity to the business owner who can make accurate decisions about how to resolve issues. Sales operations merges duplicate customer records using documented matching criteria, finance corrects invalid GL codes based on transaction analysis, and purchasing updates vendor records with current tax IDs.
Document your cleansing decisions in audit trails that explain how you resolved ambiguous cases. When you find two customer records that might be the same entity, record which record you kept, which you merged, and what data conflicts you resolved. This documentation protects you during post-migration audits and provides guidance for handling similar situations in the new system.
Cleansing in your source system is always cheaper and less risky than attempting fixes after migration to production.
Design target structure and rules
Configure your new ERP with data structures and validation rules that prevent quality issues from recurring. Set required fields that enforce completeness, create pick lists that standardize category values, establish format masks for codes and identifiers, and implement workflow approvals for high-risk changes. Design these controls based on the quality problems you discovered, turning past failures into future prevention.
Build business rules directly into your target system configuration. If your analysis revealed that transactions without cost centers create reporting problems, make cost center a required field in NetSuite or Acumatica. This proactive design ensures that your migrated data meets higher standards than what existed before.
Step 4. Build the migration plan and controls
You now translate your mapping specifications and cleansed data into executable project plans that control risk at every stage. This phase creates the detailed timeline, resource allocation, testing protocols, and contingency procedures that separate successful migrations from failed ones. Your data migration checklist requires documented plans that specify who does what, when they do it, and how you verify the results before committing to production.
Create a detailed timeline and sequence
Map out the migration in specific phases that allow for validation between steps. Start with a pilot migration of reference data like chart of accounts and vendor master files, which carry lower risk but test your processes. Follow with historical transactional data that closes out legacy periods, then migrate open transactions that affect current operations. Schedule your final cutover for a period-end weekend to minimize business disruption.
Build buffer time into your schedule for remediation cycles. Allocate 20-30% more time than your best estimate, because testing always reveals issues that require fixes and retesting. Document dependencies between migration tasks so you know which activities must complete before others can start.
Establish testing protocols
Define multiple testing cycles that progressively increase in scope and rigor. Your initial unit tests verify that individual data sets migrate correctly in isolation. Integration tests confirm that related entities maintain their relationships, such as customer records linking properly to their transaction histories. Full system tests validate that migrated data supports end-to-end business processes like quote-to-cash and procure-to-pay.

Create test scripts that specify exact validation steps:
| Test Case | Data Validated | Pass Criteria | Responsible Party |
|---|---|---|---|
| GL Balance | Trial balance totals | Matches source within $100 | Controller |
| AR Aging | Customer balance by period | 100% match to source report | AR Manager |
| Inventory Value | Total inventory value | Matches perpetual inventory | Operations Director |
Testing must validate not just that data moved, but that it supports actual business processes in your new ERP.
Define rollback and contingency procedures
Document specific triggers that require you to halt migration and revert to legacy systems. Establish thresholds for acceptable error rates, criteria for data quality failures, and escalation paths for technical problems. Your plan should specify exactly how to restore operations if critical issues surface during or after cutover, including communication protocols for notifying users and stakeholders.
Step 5. Execute migration with monitoring
This phase moves your prepared data into production while maintaining continuous oversight of every record, transformation, and load operation. Your execution plan activates the technical procedures you built, but success depends on real-time visibility into what’s actually happening as data moves between systems. Your data migration checklist tracks completion milestones and exception handling throughout this critical period when technical issues directly threaten your go-live date.
Execute extraction and staging
You begin by pulling data from your source systems using the extraction scripts you tested during previous cycles. Run these procedures during low-activity periods to minimize performance impact on operational systems, and verify that record counts match your baseline inventory. Load extracted data into a staging environment where you can inspect it before transformation begins.
Validate that extraction captured complete datasets including all required fields, relationships, and historical records. Compare record counts to your documented inventory, check that date ranges cover your specified migration window, and confirm that your staging environment contains no corrupted or truncated records. This checkpoint prevents you from discovering incomplete extractions only after you have started loading transformed data into your target system.
Transform and load with logging
Apply your transformation rules systematically, processing one data entity at a time according to your documented sequence. Execute the mapping specifications and business rules you created, while logging every transformation decision, default value applied, and exception encountered. Your logs become the audit trail that explains how source data became target records.
Load transformed data into your new ERP using batch processing that allows for validation between loads. Start with reference data, verify its accuracy, then proceed to transactional data. Monitor system performance metrics to ensure the load process does not degrade response times or consume excessive resources.
Real-time monitoring during execution catches problems while you still have time to remediate before users start working in the new system.
Track errors and exceptions
Configure automated alerts that notify your technical and business teams immediately when errors exceed defined thresholds. Set up dashboards that display current record counts, error rates, processing speeds, and completion percentages. Document every error in a structured log that captures the failed record identifier, error type, root cause, and remediation action.
Create an exception queue for records that fail validation:
| Record ID | Entity Type | Error Description | Assigned To | Status |
|---|---|---|---|---|
| CUST-1047 | Customer | Invalid tax jurisdiction | Sales Ops | In Progress |
| INV-8821 | Inventory | Missing cost center | Operations | Resolved |
| AP-4429 | Vendor | Duplicate tax ID | Procurement | Open |
Assign responsibility for resolving each exception and track remediation progress to prevent unresolved issues from accumulating.
Step 6. Validate, reconcile, and sign off
This final step confirms that your migrated data meets the accuracy standards and business requirements you established at the start of your project. You systematically verify that every critical data element loaded correctly, that financial totals balance across systems, and that your new ERP supports the operational processes your teams depend on. Your data migration checklist requires documented validation results and formal approvals before you decommission legacy systems and commit fully to production.
Run comprehensive validation checks
Execute the test scripts you created during planning, covering every critical business process and data entity. Verify that customer records contain complete contact information and accurate credit limits, that inventory quantities match your physical counts and perpetual records, and that vendor files include current payment terms and tax identifications. Run automated queries that compare record counts, sum totals, and key field values between source and target systems.
Perform manual spot checks on complex transactions that automated scripts cannot fully validate. Review multi-entity consolidations to confirm they reconstruct properly, examine revenue recognition schedules to verify timing and amounts, and inspect purchase orders to ensure approval workflows and receiving histories carried forward intact. Your business process owners must confirm that the data supports their daily operations, not just that technical record counts match.
Validation proves your migration succeeded only when actual users can complete real business transactions using the migrated data.
Reconcile financial totals
Your controller must verify that every financial balance in your new system ties back to source system reports with zero unexplained variances. Reconcile your trial balance account by account, comparing opening balances to your last closed period in the legacy system. Validate that accounts receivable aging matches customer-by-customer, that accounts payable open items agree to vendor statements, and that inventory valuations reflect accurate costs and quantities.

Document all reconciliation results in a formal variance report that explains any differences discovered. Even minor discrepancies require investigation and resolution before final approval. Your audit trail must demonstrate that you achieved the financial data accuracy required for regulatory compliance and management reporting.
Obtain formal sign-off
Secure written approval from every business owner who depends on migrated data. Create a sign-off document that lists each data domain, the validation results achieved, any outstanding exceptions with mitigation plans, and the explicit approval from the responsible executive. Your CFO signs off on financial data, your sales leader approves customer records, and your operations director confirms inventory accuracy.
This documented approval protects your project team by establishing shared accountability for migration quality and creates the formal gate that authorizes decommissioning legacy systems.
Next steps after go-live
Your data migration checklist ensures accuracy during cutover, but your work continues after users start operating in the new system. Monitor system performance during the first weeks, track any data issues your teams report, and maintain regular reconciliation schedules until you confirm stable operations. Keep your legacy systems in read-only mode for at least 90 days to support any lookups or corrections that surface during normal business cycles.
Document lessons learned while the experience remains fresh. Record which data quality issues caused the most remediation effort, which validation procedures proved most valuable, and which timeline estimates missed the mark. This knowledge improves your next integration or system enhancement project.
Migration quality directly affects your ERP ROI timeline. At Concentrus, we build data migration into every phase of our ROI Roadmap™ methodology because financial data accuracy determines how quickly you achieve measurable returns. If you are planning a NetSuite or Acumatica implementation, or if you need to rescue an underperforming ERP project, contact our team to discuss how we guarantee ROI accountability from data migration through long-term optimization.