

A NetSuite ERP implementation can transform how your finance team operates, or it can drain resources and deliver disappointing results. The difference often comes down to preparation and methodology. This NetSuite implementation guide gives you the framework to get it right the first time, whether you’re leading the project internally or evaluating consulting partners.
You need specifics: what phases to expect, how long each takes, what resources you’ll need, and what the real costs look like. Generic advice won’t cut it when you’re accountable for delivering measurable ROI on a significant technology investment. That’s why this guide breaks down the implementation process into actionable steps, complete with checklists and realistic timelines based on actual project experience.
At Concentrus, we’ve guided midsized companies through NetSuite implementations, and rescued projects that went sideways, using our ROI Roadmap™ methodology. Every recommendation in this guide reflects what we’ve learned about aligning ERP projects with financial outcomes. By the end, you’ll understand exactly what a successful implementation requires, from initial planning through go-live and beyond, so you can move forward with confidence rather than uncertainty.
Scope, Timeline, and Cost Basics
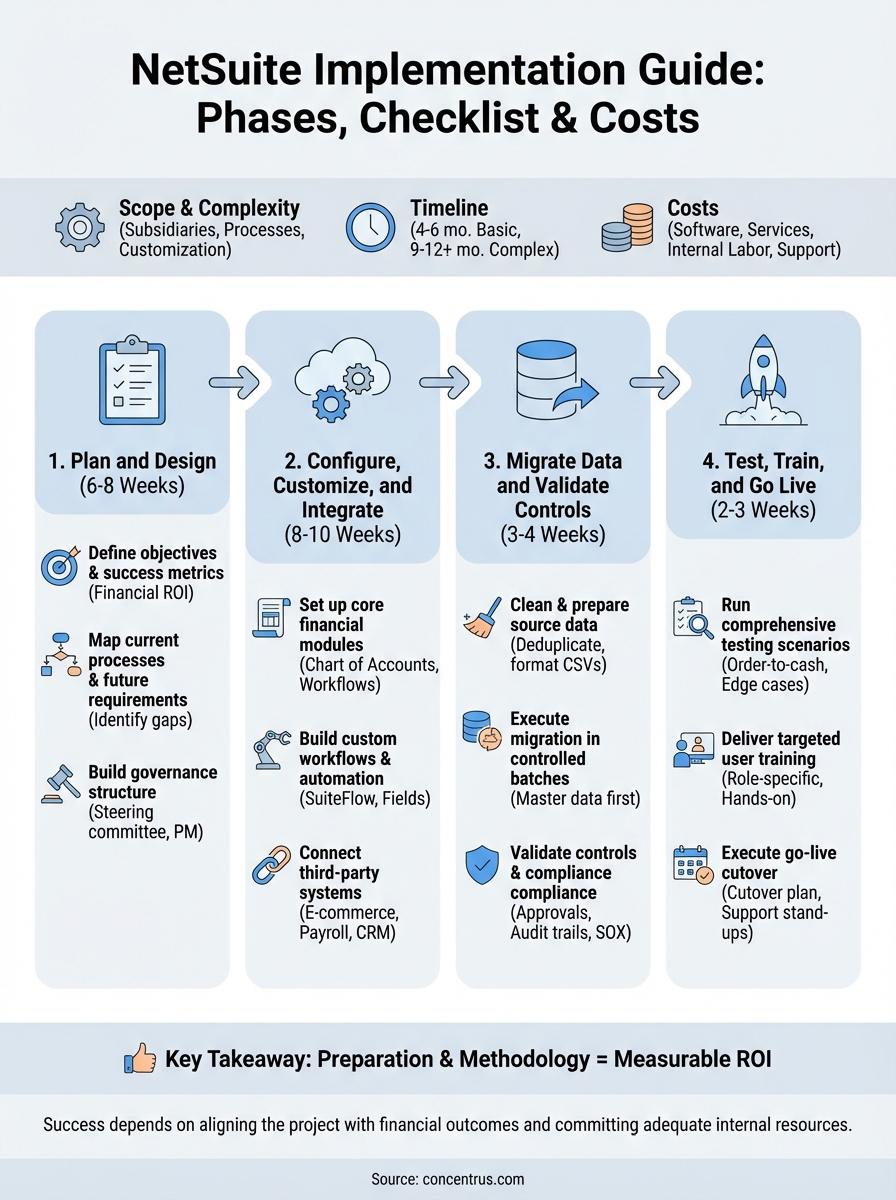
Your NetSuite implementation scope depends on three core variables: the number of subsidiaries you need to consolidate, the complexity of your existing processes, and the level of customization required. A basic implementation might cover general ledger, accounts payable, accounts receivable, and financial reporting for a single entity. Mid-complexity projects add inventory management, order fulfillment, and CRM integration. Enterprise-level implementations involve multiple subsidiaries, complex manufacturing workflows, and extensive third-party integrations that extend NetSuite’s native capabilities.
Understanding your scope upfront prevents the scope creep that derails timelines and budgets.
The size of your implementation team directly impacts both timeline and cost. You need dedicated internal resources who understand your business processes, not just IT staff. This typically includes a project sponsor (usually a CFO or Controller), a full-time project manager, key users from finance, operations, and sales, and IT support for technical configurations. Most midsized companies underestimate the time commitment required from these internal resources, which causes delays when team members get pulled back into daily operations.
What Drives Implementation Scope
Your industry requirements shape scope more than company size alone. Manufacturing companies need production planning, work order management, and supply chain visibility. Wholesale distributors prioritize order management, warehouse operations, and customer portals. Service organizations focus on project accounting, resource management, and professional services automation. Each industry brings specific compliance needs that add complexity, from FDA regulations in pharmaceuticals to SOX controls in public companies.
Existing system complexity determines how much data transformation and process reengineering you’ll face. If you’re running on QuickBooks with minimal customization, your migration path stays straightforward. Legacy ERP systems with custom code, multiple databases, and manual workarounds require significant cleanup before you can move data into NetSuite. The number of integrations you need with other systems (e-commerce platforms, payment processors, warehouse management systems) adds time and cost to every project phase.
Typical Project Timelines
Standard NetSuite implementations for midsized companies take 4 to 6 months from kickoff to go-live. This assumes a single subsidiary, moderate process complexity, and dedicated internal resources. You’ll spend roughly 6 to 8 weeks in planning and design, 8 to 10 weeks in configuration and customization, 3 to 4 weeks in data migration and testing, and 2 to 3 weeks in final testing and training before go-live.

Complex implementations with multiple entities, extensive customizations, or significant integrations extend to 9 to 12 months. Accelerated implementations can compress timelines to 3 months, but only if you limit customization, have clean data, and commit full-time internal resources throughout the project. Rushing implementation to meet arbitrary deadlines typically backfires, creating technical debt and user adoption problems that cost more to fix post-go-live than doing it right initially.
| Implementation Scope | Typical Timeline | Key Variables |
|---|---|---|
| Basic (single entity, standard processes) | 4-6 months | Clean data, limited customization |
| Mid-complexity (2-3 entities, moderate customization) | 6-9 months | Multiple integrations, industry-specific needs |
| Enterprise (multiple entities, complex workflows) | 9-12 months | Heavy customization, legacy system complexity |
Cost Components and Ranges
NetSuite implementation costs break into four main categories: software licensing, implementation services, internal labor, and ongoing support. Software licensing typically runs $999 to $9,999+ per month depending on modules, user count, and transaction volume. Implementation services from partners range from $50,000 to $500,000+ based on scope complexity. Your internal labor cost (the salary and productivity cost of pulling team members off other work) often matches or exceeds external consulting fees but gets overlooked in budget planning.
Professional services rates vary by partner expertise and project complexity. Expect $150 to $250+ per hour for experienced NetSuite consultants. Fixed-fee projects provide budget certainty but require clearly defined scope. Time and materials arrangements offer flexibility for evolving requirements but carry budget risk if you lack strong project governance. This NetSuite implementation guide recommends fixed-fee structures with defined milestones tied to deliverables, giving you both cost predictability and quality accountability.
Third-party integration costs add $10,000 to $100,000+ depending on complexity. Simple connector apps (like Avalara for tax or ShipStation for fulfillment) cost a few thousand dollars. Custom API integrations with proprietary systems or complex data synchronization requirements push costs significantly higher. Post-implementation support typically runs 15% to 20% of annual licensing costs, covering ongoing optimization, user training refreshers, and system updates as your business evolves.
Phase 1. Plan and Design the Implementation
The planning phase determines whether your NetSuite implementation delivers ROI or becomes another failed ERP project. You need to document your current state, define measurable success criteria, and build a governance structure before you touch any configuration settings. Most companies rush through this phase to get to the “real work” of system setup, then spend months fixing avoidable problems. This NetSuite implementation guide emphasizes getting Phase 1 right because the decisions you make here ripple through every subsequent phase.
Your planning phase typically consumes 6 to 8 weeks and involves more business process analysis than technical work. You’ll identify which processes to standardize, which customizations genuinely add value, and how you’ll measure success beyond “the system goes live.” Strong planning creates a clear project roadmap that keeps your team aligned and your budget under control throughout implementation.
Define Business Objectives and Success Metrics
Start by translating your ERP investment into specific financial outcomes you can track. Instead of vague goals like “improve efficiency,” define measurable targets such as reducing month-end close from 15 days to 5 days, decreasing inventory carrying costs by 20%, or eliminating 80% of manual data entry. Your success metrics should tie directly to KPIs that matter to your CFO, not just system functionality metrics like user adoption rates or transaction processing speed.
Define 3 to 5 primary success metrics that link directly to financial performance before you build any requirements.
Document the baseline performance for each metric using current data. If you want to improve order-to-cash cycle time, measure exactly how long it takes today, where delays occur, and what causes them. This baseline gives you objective proof of ROI when you measure the same metrics six months post-implementation. Include both quantitative metrics (days to close, error rates, processing costs) and qualitative outcomes (visibility into real-time data, confidence in financial reporting) in your documentation.
Map current processes and future requirements
Document how your team actually works today, not how your process documentation says they should work. Shadow key users through complete workflows from customer order entry through revenue recognition, or from purchase requisition through vendor payment. You’ll discover workarounds, manual steps, and disconnected systems that your team built to compensate for limitations in current tools. These insights reveal which NetSuite features solve real problems versus which customizations you’re requesting out of habit.
Your process mapping should identify three categories of requirements: must-haves that are non-negotiable for business operations, should-haves that improve efficiency but aren’t critical for go-live, and nice-to-haves that you can defer to future phases. This prioritization prevents scope creep and keeps your implementation timeline realistic. Create a requirements traceability matrix that links each requirement to a specific business objective and success metric, ensuring every feature you implement serves a defined purpose.
Build your project governance structure
Establish a steering committee that includes your CFO or Controller, department heads from operations and sales, IT leadership, and your implementation partner. This committee meets biweekly to review progress, resolve cross-functional conflicts, and approve scope changes. Without executive-level governance, implementation projects stall when departments disagree on process standardization or resource priorities.
Assign a dedicated project manager who owns day-to-day coordination, tracks deliverables, and escalates issues before they become blockers. Your PM needs authority to pull resources from other projects and make tactical decisions within the approved scope. Define a clear RACI matrix (Responsible, Accountable, Consulted, Informed) for every major deliverable so team members understand their roles and decision-making authority throughout the implementation.
Phase 2. Configure, customize, and integrate
Configuration work transforms NetSuite from a blank platform into your operational system of record. You’ll spend 8 to 10 weeks building your chart of accounts, setting up subsidiaries, defining workflows, creating custom fields, and connecting external systems. This phase requires daily collaboration between your implementation partner, internal IT team, and business users who understand how processes should function. Every configuration decision should trace back to the requirements you documented in Phase 1.
Your configuration work follows a specific sequence. Start with foundational elements like company structure, fiscal calendar, and currency settings before moving to transactional workflows. Attempting to configure advanced features like revenue recognition rules or inventory costing methods before your foundation is solid creates rework. This NetSuite implementation guide recommends weekly configuration reviews with your steering committee to catch misalignments before they compound into larger problems.
Set up core financial modules
Begin by building your chart of accounts that balances granular reporting needs with simplicity. Most companies migrate from legacy systems with overly complex account structures built up over decades. NetSuite’s segmented account structure lets you track financial data by department, location, class, or custom dimensions without creating thousands of individual accounts. Configure your segments to match how executives actually analyze performance, not how your old system forced you to report.
Configure your period close workflow to match the sequence your accounting team follows. Define required approvals, standard journal entry templates, and reconciliation requirements for each subsidiary. Set up automatic intercompany eliminations if you operate multiple entities. Your approval hierarchies for purchase orders, expense reports, and vendor bills should mirror your delegation of authority policy, with appropriate thresholds that escalate to finance leadership for material transactions.
Configure NetSuite to enforce controls at the point of transaction entry rather than relying on manual reviews after the fact.
Build custom workflows and automation
NetSuite’s SuiteFlow tool lets you automate business processes without writing code. Create workflows for common scenarios like automatic approval routing based on transaction amount, customer credit hold notifications when balances exceed limits, or inventory reorder alerts when stock drops below safety levels. Document each workflow with clear logic maps that show decision points, actions, and exception handling so your team can maintain them after go-live.
Custom fields extend NetSuite’s data model to capture industry-specific information your business requires. Manufacturing companies might add fields for lot traceability or quality inspection results. Service organizations track project phase completion or resource utilization metrics. Limit custom fields to data you’ll actively use for reporting or decision-making, not information that seems nice to have but serves no operational purpose.
Connect third-party systems
Your integration strategy determines how well NetSuite functions as your central data hub. Identify which systems need real-time synchronization versus batch updates overnight. E-commerce platforms typically require real-time inventory updates to prevent overselling. Payroll systems can sync on scheduled intervals since hourly updates provide no business value. Use pre-built connectors from NetSuite’s SuiteApp marketplace for common integrations like Avalara tax automation, ShipStation fulfillment, or Salesforce CRM before building custom API connections.
Map data fields between systems to ensure consistent information flow without manual intervention. Your product SKU in NetSuite must match identically to your e-commerce platform, warehouse management system, and any other connected applications. Test each integration with sample transactions that cover normal scenarios and edge cases like returns, partial shipments, or cancelled orders before connecting to production data.
Phase 3. Migrate data and validate controls
Data migration separates successful implementations from projects that limp into production with unreliable information. You’ll spend 3 to 4 weeks extracting data from legacy systems, cleaning it to meet NetSuite’s validation rules, and loading it in controlled batches that let you verify accuracy before moving forward. This NetSuite implementation guide emphasizes that rushed data migration creates problems that plague your system for years, from duplicate customer records to incorrect inventory balances that destroy trust in financial reporting.
Your migration work follows a structured sequence that starts with master data (chart of accounts, customers, vendors, items) before moving to transactional history. Loading transactions before you’ve finalized master records forces you to rework mappings and rerun imports. Plan for multiple iteration cycles where you test migration scripts with sample data, identify issues, refine your transformation logic, and test again until you achieve 100% accuracy.
Clean and prepare source data
Extract your source data into CSV or Excel files that match NetSuite’s import templates exactly. Your legacy system likely contains duplicate customer records with slight variations in names or addresses, inactive vendors that should be archived rather than migrated, and chart of account codes that need consolidation. Clean this data before you attempt migration rather than importing messy records that require manual cleanup inside NetSuite.
Validate that your data meets NetSuite’s required field rules and business logic. Customer records need valid payment terms and assigned sales reps. Inventory items require costing methods and default locations. Test your cleaned data against NetSuite’s CSV import specifications to catch formatting issues, missing mandatory fields, or values that exceed character limits before you run full migration batches.
Clean your source data in staging files before importing into NetSuite rather than fixing problems after migration.
Execute migration in controlled batches
Load master data first using NetSuite’s CSV Import tool or SuiteScript for complex transformations. Start with a pilot batch of 50 to 100 records to verify your field mappings work correctly. Review imported records in NetSuite to confirm all data landed in the right fields with proper formatting. Scale up to larger batches only after you’ve validated your import logic produces accurate results.

Migrate transactional history in chronological order starting with your go-live fiscal period. Most companies need 2 to 3 years of historical transactions for trend analysis and audit requirements. Document which transactions you’re migrating versus archiving in your legacy system to maintain a clear audit trail that satisfies compliance requirements.
Validate controls and compliance requirements
Configure your approval workflows, segregation of duties rules, and audit trails according to your internal control framework. Map which roles can create versus approve transactions, who can modify posted periods, and which reports provide audit evidence for SOX compliance or industry-specific regulations. Test these controls with sample transactions that attempt to violate rules, confirming the system blocks unauthorized actions before go-live.
Document your control validation results in a matrix showing each control objective, the NetSuite configuration that enforces it, and test evidence proving it works as designed. Your auditors will request this documentation to confirm your ERP system maintains adequate internal controls over financial reporting.
Phase 4. Test, train, and go live
Testing validates that your configured system performs as designed under real-world conditions before you commit to production. You’ll spend 2 to 3 weeks running structured test scenarios that cover standard transactions, edge cases, and integration points with external systems. Your testing phase catches configuration errors, validates data accuracy, and confirms user workflows function correctly across departments. This NetSuite implementation guide emphasizes that thorough testing prevents the panic fixes and workarounds that plague rushed implementations.
Training prepares your team to work confidently in NetSuite from day one. You need role-specific instruction that teaches finance users how to close periods, operations staff how to process orders, and managers how to run reports they’ll actually use for decision-making. Your go-live execution follows a detailed cutover plan that minimizes disruption while ensuring you start your first production period with accurate balances and working processes.
Run comprehensive testing scenarios
Build test scripts that cover your most common transactions plus scenarios that historically caused problems in your legacy system. Test complete order-to-cash workflows starting with sales quote creation through invoicing, payment application, and revenue recognition. Verify purchase-to-pay processes from requisition through three-way matching and vendor payment. Each test should compare NetSuite’s output against expected results you’ve documented from your requirements.
Create a testing matrix that assigns specific scenarios to subject matter experts who understand expected outcomes:
| Test Area | Sample Scenarios | Success Criteria |
|---|---|---|
| Order Management | Multi-item order with partial shipment | Correct inventory reduction, accurate invoicing |
| Financial Close | Period-end journal entries with approvals | Proper GL impact, audit trail maintained |
| Integrations | E-commerce order syncs to NetSuite | Real-time inventory update, customer record match |
| Reporting | Monthly P&L by department |
Balances match GL, calculations accurate |
Test your integration failure scenarios to confirm the system handles errors gracefully rather than allowing corrupt data through.
Deliver targeted user training
Schedule hands-on training sessions by role rather than generic overviews that waste time covering features users won’t need. Finance teams need deep training on period close workflows, journal entries, and reconciliation tools. Operations staff require focus on order processing, inventory management, and fulfillment tracking. Your training should use real company data from your test environment, not generic examples that don’t reflect actual workflows.
Record training sessions for reference documentation users can review when they encounter unfamiliar situations post-go-live. Build quick reference guides that show step-by-step instructions with screenshots for the 10 to 15 most frequent tasks each role performs. Schedule refresher sessions two weeks after go-live to address questions that emerge once users work in the production environment.
Execute your go-live cutover
Your cutover plan specifies exactly when you’ll stop processing transactions in your legacy system, finalize data migration, and begin live operations in NetSuite. Most companies choose month-end or quarter-end cutover dates to align with natural reporting boundaries. Block out a weekend or slow period for final data loads, system validation, and opening balance verification before users start transacting.
Assign specific team members to monitor each functional area during the first week of production. Watch for transaction processing errors, integration failures, or user confusion that requires immediate support. Hold daily stand-up meetings for the first two weeks to surface issues quickly and coordinate resolution before small problems compound into operational disruptions.
Next steps for your team
Your NetSuite implementation success depends on choosing the right methodology and committing adequate internal resources from day one. This NetSuite implementation guide has outlined the four critical phases, but knowing the process differs from executing it with the discipline required to deliver ROI. Most companies underestimate the planning and data preparation work that separates successful implementations from projects that require expensive fixes post-go-live.
Start by assembling your project governance team and documenting your baseline metrics for the financial outcomes you need to improve. Define which processes you’ll standardize versus customize, and identify which integrations provide the highest value. If you’re evaluating implementation partners, look for firms that tie every project decision to measurable business outcomes rather than just technical specifications.
At Concentrus, we’ve guided finance leaders through NetSuite implementations using our ROI Roadmap™ methodology that guarantees results. Schedule a consultation with our team to discuss your specific requirements and learn how we build implementation plans around your financial goals.
References
- Deloitte. (2023). ERP Transformation and Value Realization. Deloitte Insights.
- Gartner. (2024). Best Practices for ERP Implementation and Governance. Gartner Research.
- Oracle NetSuite. (2024). NetSuite Implementation and SuiteSuccess Methodology. Oracle Corporation.
- Panorama Consulting Group. (2023). ERP Report: Implementation Success and Failure Factors. Panorama Consulting Solutions.