

Sales says one thing, finance says another, and by the time you reconcile HubSpot deal data with NetSuite invoices, the quarter is already closed. A proper hubspot netsuite integration fixes that gap by syncing customers, orders, and payment status between the two systems automatically, so your revenue numbers match what sales actually closed. If you’ve been exporting CSVs or manually re-keying deals into NetSuite, you already know how fast that breaks down as deal volume grows.
This guide walks through exactly how to connect the two platforms, covering native connector options, middleware tools like Celigo, and what data typically needs to map between contacts, deals, and sales orders. You’ll get a clear picture of the setup steps, the common configuration decisions, and where teams usually get stuck.
We work with CFOs and finance leaders every day who need HubSpot and NetSuite talking to each other without breaking financial reporting or slowing down close. That experience shapes what follows: a practical, step-by-step integration path rather than a generic feature list, so you can decide whether to build it yourself or bring in help to get it right the first time.
What a HubSpot NetSuite integration connects
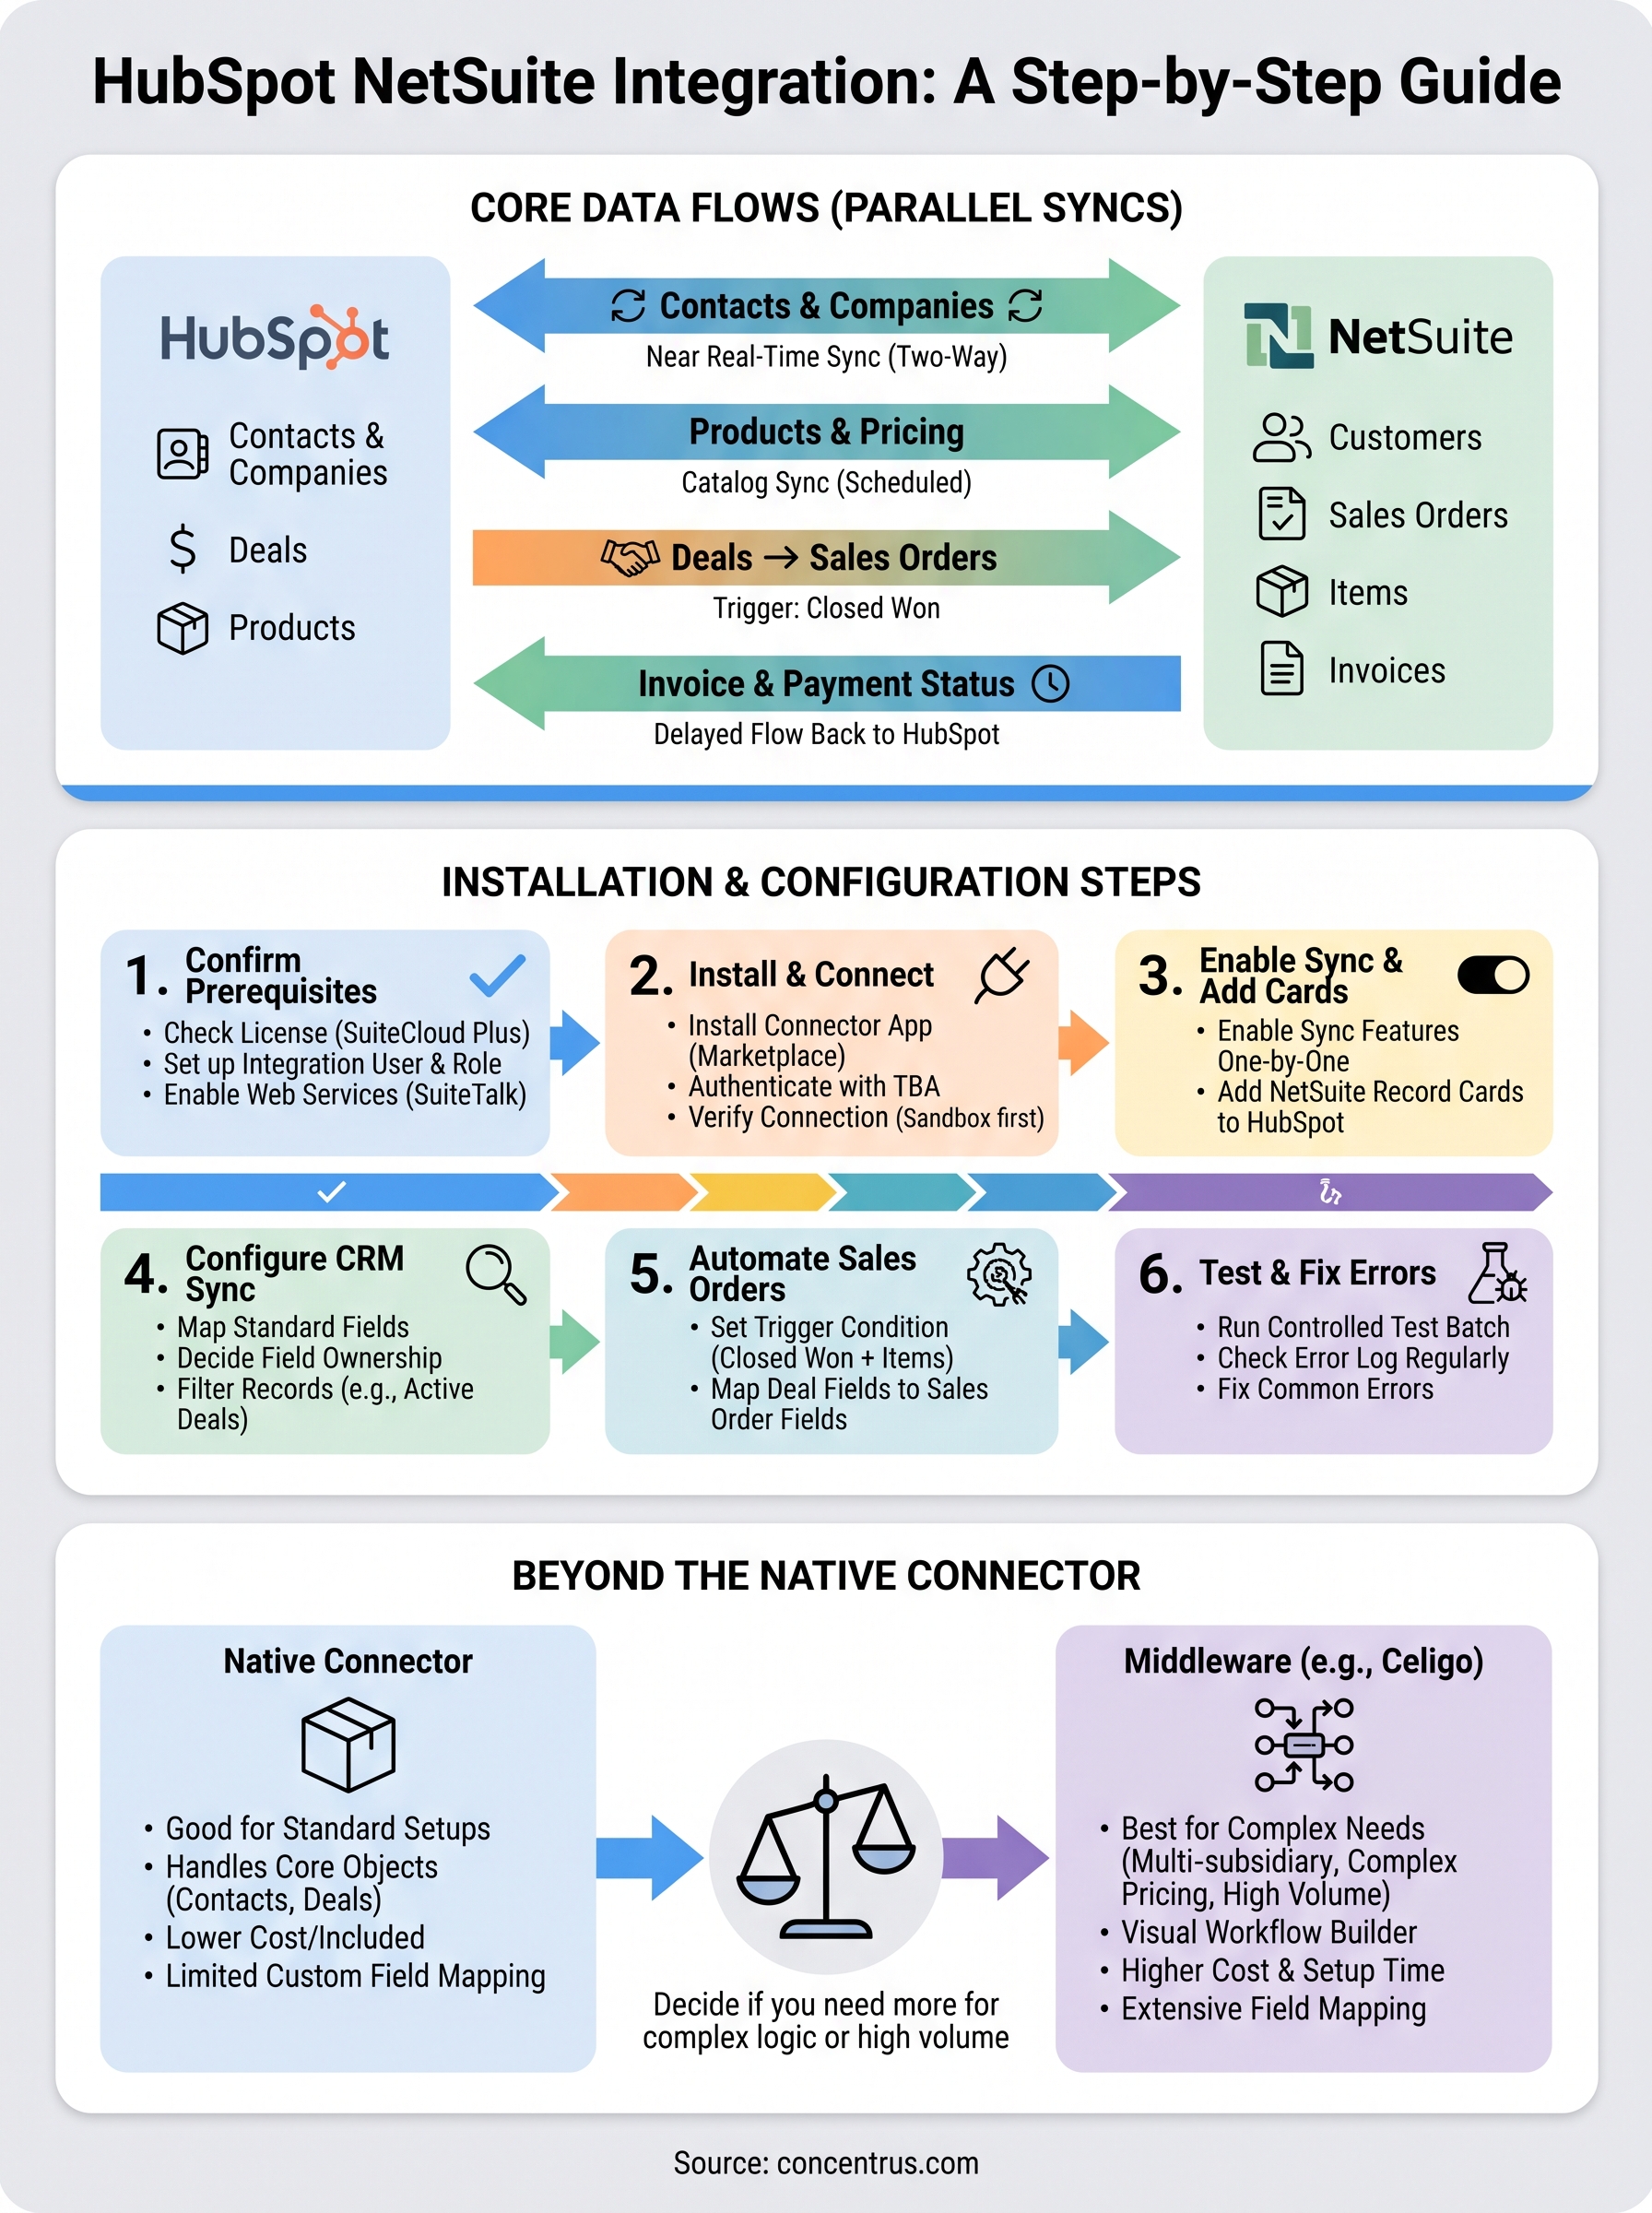
Before you touch a setup wizard, you need a mental map of what actually moves between the two systems. A hubspot netsuite integration isn’t one connection, it’s several parallel syncs running on different schedules: contacts and companies sync near real-time, deals and sales orders sync on close or on a scheduled job, and financial data like invoice status and payment history usually flows back into HubSpot on a delay. Treating it as a single “integration” instead of a set of distinct data flows is the most common reason teams get confused when one piece breaks and the rest keeps working fine.
The integration only earns its keep once your finance team can trust a HubSpot deal amount matches the NetSuite sales order without anyone checking by hand.
Getting that trust requires knowing exactly which fields map where, and in which direction the data is supposed to travel.
The core objects every integration syncs
Most netsuite hubspot integration projects revolve around five record types. Contacts and companies in HubSpot typically map to Contacts and Customers in NetSuite. Deals map to Sales Orders (sometimes Opportunities first, then Sales Orders once closed-won). Products and pricing sync from NetSuite’s item catalog into HubSpot’s deal line items so sales quotes reflect real inventory and pricing, not guesses. Here’s how that typically breaks down:
| HubSpot Object | NetSuite Object | Typical Direction | Common Trigger |
|---|---|---|---|
| Contact | Contact/Customer | Two-way | Record create or update |
| Company | Customer | Two-way | Record create or update |
| Deal | Sales Order | HubSpot to NetSuite | Deal stage = Closed Won |
| Line Item/Product | Item | NetSuite to HubSpot | Catalog sync (scheduled) |
| Invoice/Payment Status | Deal property | NetSuite to HubSpot | Invoice paid/overdue status change |
Notice the direction column. Customer and contact data generally flows both ways because either team might create a record first. Financial truth, though, flows one way: from NetSuite to HubSpot. NetSuite is the system of record for anything involving money, and your integration should respect that hierarchy rather than let HubSpot overwrite invoice or payment data.
Where the money data has to line up
Syncing names and emails is the easy part. The part that actually matters to a CFO is getting hubspot to netsuite integration flows to carry the right dollar amounts, tax treatment, and payment terms without manual correction. When a rep closes a deal in HubSpot, the sales order created in NetSuite needs the correct customer record, the correct item and pricing (pulled from NetSuite, not typed by the rep), the right tax nexus, and the right terms code. Miss any one of these and your AR team spends the first week of every month chasing down sales orders that don’t match the quote the customer actually signed.
Revenue recognition schedules, subscription renewal dates, and multi-currency conversions rarely sync cleanly through a native connector, and that’s worth flagging early rather than discovering it during your first close. If your business runs recurring revenue or operates in multiple currencies, plan for extra configuration work or a middleware layer, which we’ll get into later in this guide.
What doesn’t sync automatically
Several things commonly get assumed as part of the integration and aren’t, at least not out of the box:
- Custom NetSuite fields and saved searches rarely map to HubSpot without manual field configuration.
- Historical deal or invoice data typically isn’t backfilled; the sync starts from the point you turn it on.
- Multi-subsidiary structures in NetSuite OneWorld often need extra mapping logic per subsidiary.
- Complex approval workflows (like multi-step sales order approvals) usually live entirely in NetSuite and won’t reflect back in HubSpot in real time.
- Marketing attribution data stays in HubSpot; NetSuite has no concept of campaigns or lead sources.
Knowing these gaps upfront saves you from promising your sales team a fully automated pipeline when parts of it still need a human checking the numbers. The next section covers what has to be true on the NetSuite side before you install anything.
Step 1. Confirm your NetSuite prerequisites
Before you open the HubSpot marketplace, get your NetSuite environment ready. Most integration headaches trace back to skipped prerequisites rather than bad configuration, and fixing permissions after the fact means redoing setup work you already completed. A hubspot netsuite integration only installs cleanly when NetSuite’s administrative and technical requirements are in place first.
Confirm the right NetSuite edition and access
Check that your NetSuite account includes SuiteCloud Plus or an equivalent SuiteCloud license, since the connector relies on SuiteTalk web services and, in some setups, SuiteScript to move records. Standard NetSuite editions without SuiteCloud enabled will block the connection at the authentication step, and support tickets about this take days to resolve if you catch it late. Someone with the Administrator role needs to log in and enable web services access under Setup, and that same person should confirm your subscription includes enough integration record slots, since each connected app (HubSpot, Celigo, Avalara, and so on) consumes one.
A blocked SuiteTalk connection at hour one usually means a licensing gap, not a setup mistake.
Set up the integration user and role
NetSuite treats every connected app as a distinct user for audit and permission purposes, so create a dedicated integration user rather than authenticating through someone’s personal login. Give that user a custom role scoped to only what the sync needs: read/write on Customers, Contacts, Sales Orders, and Items, plus read access to Sales Tax and pricing tables. Avoid handing the integration a full Administrator role. It’s the fastest way to get the connector working and the fastest way to lose visibility into what changed and why during an audit.
Here’s the minimum checklist to run through before moving to Step 2:
- SuiteCloud Plus (or equivalent) license active on the account
- Web services (SuiteTalk) enabled under Setup > Company > Enable Features
- Dedicated integration record created under Setup > Integration Management
- Custom role built with scoped permissions (Customer, Contact, Sales Order, Item, Sales Tax)
- Token-based authentication (TBA) or OAuth 2.0 credentials generated for that role
- Sandbox account available for testing before connecting production data
Check your HubSpot tier and permissions too
Don’t assume the HubSpot side is automatically ready either. Native NetSuite connectors typically require a paid HubSpot tier with access to custom properties and workflow automation, since free or entry-level plans can’t create the custom deal properties the sync depends on. Confirm your HubSpot user has Super Admin permissions before you attempt the connection, since app installs and property creation both require it.
If any of this NetSuite prerequisite work feels unfamiliar, that’s normal. It’s exactly the kind of environment setup our NetSuite implementation team handles before touching a single integration, precisely because a misconfigured role costs more time to unwind than to get right upfront. With prerequisites confirmed, you’re ready to actually install the connector.
Step 2. Install and connect the native connector
With prerequisites confirmed, the actual install takes less time than you’d expect, usually under an hour if your NetSuite roles are set up correctly. This is the point where a hubspot netsuite integration goes from checklist item to live connection, so slow down here and verify each step rather than clicking through the wizard on autopilot. Most connection failures at this stage trace back to authentication, not the software itself.

Install the connector app
Open the HubSpot Marketplace from your HubSpot account and search for the official NetSuite connector, then click Install. HubSpot will prompt you to log into NetSuite directly from that install flow, and this is where your dedicated integration user from Step 1 comes into play. Log in with that user, not your personal admin credentials, so the audit trail in NetSuite reflects the integration correctly rather than showing every synced record as if you typed it in by hand.
Authenticate with token-based access
NetSuite will ask you to authorize the connection using either Token-Based Authentication (TBA) or OAuth 2.0, depending on which your account supports. TBA is still the more common path for this netsuite integration hubspot setup, and it requires four pieces of information generated from the integration record you created earlier.
Consumer Key: [generated in Setup > Integration Management]
Consumer Secret: [generated in Setup > Integration Management]
Token ID: [generated for the integration user's role]
Token Secret: [generated for the integration user's role]
A connector authenticated with the wrong role won’t fail loudly. It’ll sync partial data and let you find the gaps weeks later.
Paste these into the HubSpot authorization screen exactly as generated. NetSuite tokens don’t regenerate automatically if you fat-finger a character, so copy directly from the source rather than retyping from a screenshot.
Verify the connection before moving on
Once HubSpot confirms the handshake, don’t assume it worked just because the screen shows a green checkmark. Run through this quick verification list before enabling any sync features:
- Check the connection status in HubSpot’s Connected Apps settings shows “Active,” not “Pending” or “Error”
- Confirm the integration user appears in NetSuite’s login audit trail under Setup > Users/Roles > View Login Audit Trail
- Test a manual record pull, usually a single customer lookup, to confirm data actually moves between systems
- Verify your sandbox connection separately if you’re testing before touching production data
Skipping this verification is how teams end up three steps deeper into configuration before discovering the connector never actually authenticated against the right subsidiary or role. Fix any red flags here before you move to enabling sync features, since every setting in Step 3 assumes the underlying connection is solid.
Step 3. Enable sync features and add record cards
With the connection verified, you’re ready to turn on the actual sync features rather than just the authentication layer. A working handshake doesn’t mean data is moving yet. This step is where you tell the hubspot netsuite integration which record types to sync, how often, and what NetSuite information your sales team gets to see without leaving HubSpot.
Turn on sync features one at a time
Open the connector’s settings panel inside HubSpot and resist the urge to flip every toggle at once. Enable contact sync first, let it run a full initial sync, and confirm records are landing correctly before turning on companies, then deals, then the item catalog. Enabling everything simultaneously makes troubleshooting nearly impossible when something goes sideways, because you won’t know which sync caused the error. Most connectors default to a sync interval somewhere between 5 and 15 minutes; leave the default in place for your first week rather than tightening it, so you have time to catch mapping issues before they compound across hundreds of records.
Turn on one sync feature at a time. When five things break at once, you’ll never know which one caused it.
Add NetSuite record cards to HubSpot
Record cards are what actually make the sync useful to a sales rep, since they surface NetSuite data (order history, current balance, invoice status) directly on the HubSpot contact, company, or deal record without anyone opening a second tab. Here’s how to add them:
- Go to Settings > Objects > select the object (Contact, Company, or Deal) where you want the card to appear
- **Click
Step 4. Configure CRM sync for contacts and companies
With sync features turned on and record cards in place, the next job is making sure contacts and companies actually map to the right NetSuite fields instead of just moving data blindly. This step decides whether your hubspot integration with netsuite produces clean customer records or duplicates that your AR team has to merge by hand every month. Field mapping is tedious, but rushing it here creates cleanup work that outlasts the initial setup by months.
Map the standard fields first
Open the CRM sync settings inside the connector and start with the fields every record needs: name, email, phone, billing address, and shipping address. NetSuite and HubSpot don’t always use the same field names or formats, so verify each mapping manually rather than trusting the connector’s default suggestions. A common mismatch is HubSpot’s single “Company Name” field against NetSuite’s separate “Company Name” and “Legal Name” fields on the Customer record, which causes duplicate customer creation if left unmapped.
HubSpot Field          NetSuite Field
---------------------------------------
Company Name       ->  Customer Name
Company Domain     ->  (custom field, not native)
Contact Email      ->  Email
Billing Address    ->  Address 1 (Bill To)
Primary Company    ->  Customer (Parent link)
Get contact and company field mapping wrong once, and you’ll spend the next quarter merging duplicate customer records instead of closing deals faster.
Decide which system owns each field
Every two-way sync needs a tiebreaker rule for what happens when both systems have different values for the same field. Set NetSuite as the source of truth for billing address, tax ID, and payment terms, since those live in the system that actually handles invoicing. Let HubSpot own fields tied to sales activity, like lead source and lifecycle stage, since NetSuite has no equivalent concept. Most connectors let you set this ownership per field rather than per object, so take the time to configure it field by field instead of accepting a blanket “HubSpot wins” or “NetSuite wins” default.
Filter which records actually sync
Not every HubSpot contact needs a NetSuite customer record, and syncing every marketing lead into your ERP clutters the customer list with people who never bought anything. Set a sync filter so only contacts tied to a deal in an active pipeline stage trigger customer creation in NetSuite. This single filter, more than any other setting in this step, is what keeps your netsuite and hubspot integration from turning into a bloated customer list that finance has to prune every quarter. Once contacts and companies are syncing cleanly and filtered correctly, you’re ready to connect the piece that actually matters most to revenue: turning closed deals into sales orders automatically.
Step 5. Automate sales order creation from closed deals
This is the step CFOs actually care about, since it’s where a HubSpot deal stops being a sales record and becomes a NetSuite sales order with real financial weight. A hubspot netsuite integration earns its keep here or nowhere, because every other sync in this guide just moves contact and company data around. Get this wrong and reps keep re-entering orders manually, which defeats the entire point of connecting the two systems.

Set the trigger condition
Open the workflow automation settings in the connector and configure the trigger that fires sales order creation. The standard trigger is deal stage equals Closed Won, but don’t stop there. Add a secondary condition requiring the deal to have at least one line item with a valid NetSuite item ID attached, since a deal closed without proper line items generates an empty or broken sales order that someone in finance then has to fix by hand.
Trigger: Deal Stage = "Closed Won"
AND Line Items > 0
AND Line Item.Item_ID is not null
AND Associated Company has valid NetSuite Customer ID
Action: Create Sales Order in NetSuite
If a deal can close without a valid customer and item ID attached, it will, and someone in finance will find out three weeks later.
Map deal fields to sales order fields
Once the trigger fires, the connector needs to know exactly which HubSpot deal fields populate which NetSuite sales order fields. Map deal amount to order total, close date to order date, and each line item’s product to the corresponding NetSuite item record rather than a free-text description. Terms and tax code should pull from the customer record on the NetSuite side, not from anything typed into HubSpot, since reps aren’t tax experts and shouldn’t be setting nexus.
| HubSpot Deal Field | NetSuite Sales Order Field | Source of Truth |
|---|---|---|
| Deal Amount | Order Total | Calculated from line items |
| Line Item | Item | NetSuite item catalog |
| Close Date | Order Date | HubSpot |
| Associated Company | Customer | NetSuite Customer ID |
| Payment Terms | Terms | NetSuite Customer record |
| Tax Code | Tax Code | NetSuite Customer record |
Decide what happens to failed order creation
Set a fallback for deals that fail the trigger conditions instead of letting them silently disappear from the queue. Most connectors let you route failed sales order attempts to a task or notification for a designated NetSuite admin, so nothing sits unprocessed for a week before anyone notices revenue isn’t flowing through. Build this fallback before you go live, not after the first failure surfaces in a monthly close meeting.
Test this automation with three or four low-stakes deals before trusting it with your real pipeline. Watch specifically for line items that don’t map to a NetSuite item ID and companies missing a Customer ID, since those two gaps account for most of the failed hubspot to netsuite integration sales order attempts we see during setup. Once orders are creating reliably, you’re ready to stress-test the whole pipeline for edge cases.
Step 6. Test the sync and fix common errors
Before you let the whole sales team rely on this, run the sync through a deliberate stress test rather than trusting that Step 5’s happy-path testing covered everything. A hubspot netsuite integration that works for three clean test deals can still choke on a real pipeline full of edge cases: missing tax codes, duplicate company names, deals with ten line items instead of one. Treat this step as the difference between an integration that survives your first real close and one that generates a support ticket during it.

Run a controlled test batch
Pull ten to fifteen real deals from your current pipeline, ideally a mix of simple single-item deals and messier multi-line, multi-currency ones if you sell that way. Push them through the full sync (contact, company, deal, sales order) and check every resulting NetSuite record against the source HubSpot data field by field, not just at a glance. Log discrepancies as you find them rather than fixing them one at a time, since patterns matter more than individual errors. If three deals fail for the same reason, that’s a mapping problem, not three coincidences.
One clean test deal proves the connector can work. Ten messy ones prove it will.
Common sync errors and what they cause
Most failures trace back to a short list of recurring issues. Here’s what to check first when something doesn’t sync:
| Error Symptom | Likely Cause | Fix |
|---|---|---|
| Sales order created with $0 total | Line item missing NetSuite Item ID | Require valid item mapping before deal can close |
| Duplicate customer records | Company Name mismatch between systems | Standardize name field, add domain matching |
| Sync stuck in “Pending” | Token expired or role permission revoked | Regenerate TBA credentials, confirm role access |
| Tax code missing on order | Customer record lacks nexus assignment | Set default nexus rule at customer creation |
| Contact synced but company didn’t | Sync order dependency, company sync ran before contact linked | Re-run company sync after contact sync completes |
Build a habit of checking the error log
Don’t wait for finance to notice a missing sales order before checking whether the sync is healthy. Most connectors keep an error log inside the integration settings, and someone (usually whoever owns the NetSuite side) should review it at least twice a week for the first month. Weekly review can drop to a spot check once the sync has run cleanly for thirty days straight, but never stop checking entirely, since a NetSuite role change or a HubSpot field rename can silently break mappings that worked fine the day before.
Set up email alerts for failed sales order attempts specifically, since those carry direct revenue impact and shouldn’t wait for a manual log check. With errors identified and a monitoring routine in place, you’re in a position to judge honestly whether the native connector is actually enough for how your business operates, which is the question the next step answers.
Step 7. Decide if you need more than the native connector
Once the sync runs clean for a few weeks, you’ll know whether the native connector actually fits how your business operates or whether you’ve hit its ceiling. A hubspot netsuite integration built on the native connector handles the core objects well, but it wasn’t built to handle every edge case a growing midsized company throws at it. Recognizing the ceiling early saves you from bolting on workarounds that make the whole system harder to maintain later.
Signs the native connector isn’t enough
Watch for a few specific patterns that show up after the first month of real use:
- Multi-subsidiary NetSuite OneWorld setups where deals need to route to different subsidiaries based on region or product line
- Complex pricing rules involving tiered discounts, contract pricing, or bundled items that the connector’s flat field mapping can’t represent
- Revenue recognition schedules for subscription or milestone billing that need to sync back into HubSpot for renewal forecasting
- High deal volume (hundreds of closed-won deals per week) that pushes past the connector’s default sync intervals and causes queue backups
- Multiple third-party tools (Avalara for tax, ShipHawk for shipping, a CPQ tool for quoting) that all need to talk to both NetSuite and HubSpot, not just to each other
If you’re checking two or more of these boxes, the native connector is probably costing you more in manual cleanup than a middleware layer would cost in setup.
A native connector that needs three workarounds to handle your pricing model isn’t cheaper. It’s just deferring the cost to your finance team every month.
Weighing middleware against staying native
Middleware platforms like Celigo sit between HubSpot and NetSuite and give you a visual workflow builder instead of the connector’s fixed field mapping, which matters once your business logic gets more complicated than “deal closes, sales order creates.” The tradeoff is real: middleware costs more, takes longer to configure, and needs someone who understands both systems’ data models to build it correctly.
| Factor | Native Connector | Middleware (e.g., Celigo) |
|---|---|---|
| Setup time | Days | Weeks |
| Custom field mapping | Limited | Extensive |
| Multi-subsidiary support | Minimal | Full |
| Cost | Lower, often included | Higher, licensed separately |
| Best for | Single-subsidiary, standard pricing | Complex pricing, multi-entity, high volume |
Most midsized companies start with the native connector and migrate to middleware once volume or complexity justifies the added cost, rather than building middleware on day one. If you’re not sure which side of that line your business falls on, that’s exactly the kind of assessment our NetSuite integration specialists walk through before recommending a path, since guessing wrong here means rebuilding the sync twice instead of once.
Making the sync work for your finance team
A working hubspot netsuite integration isn’t a one-time install, it’s a discipline: confirm prerequisites, connect carefully, map fields deliberately, and keep checking the error log long after launch. The teams that get real ROI from this treat the sync as financial infrastructure, not a sales convenience, because the moment a deal closes, that number needs to match what finance sees without anyone reconciling by hand. Skip a step, and you’re back to spreadsheets and month-end guesswork, just with more moving parts to untangle.
Whether you’re setting this up for the first time or rescuing a connector that’s been quietly generating bad sales orders for months, the fastest path is getting the field mapping and trigger logic right the first time. If you’d rather not learn NetSuite’s permission model through trial and error, talk to our ERP and ROI experts before you flip the first sync toggle.