
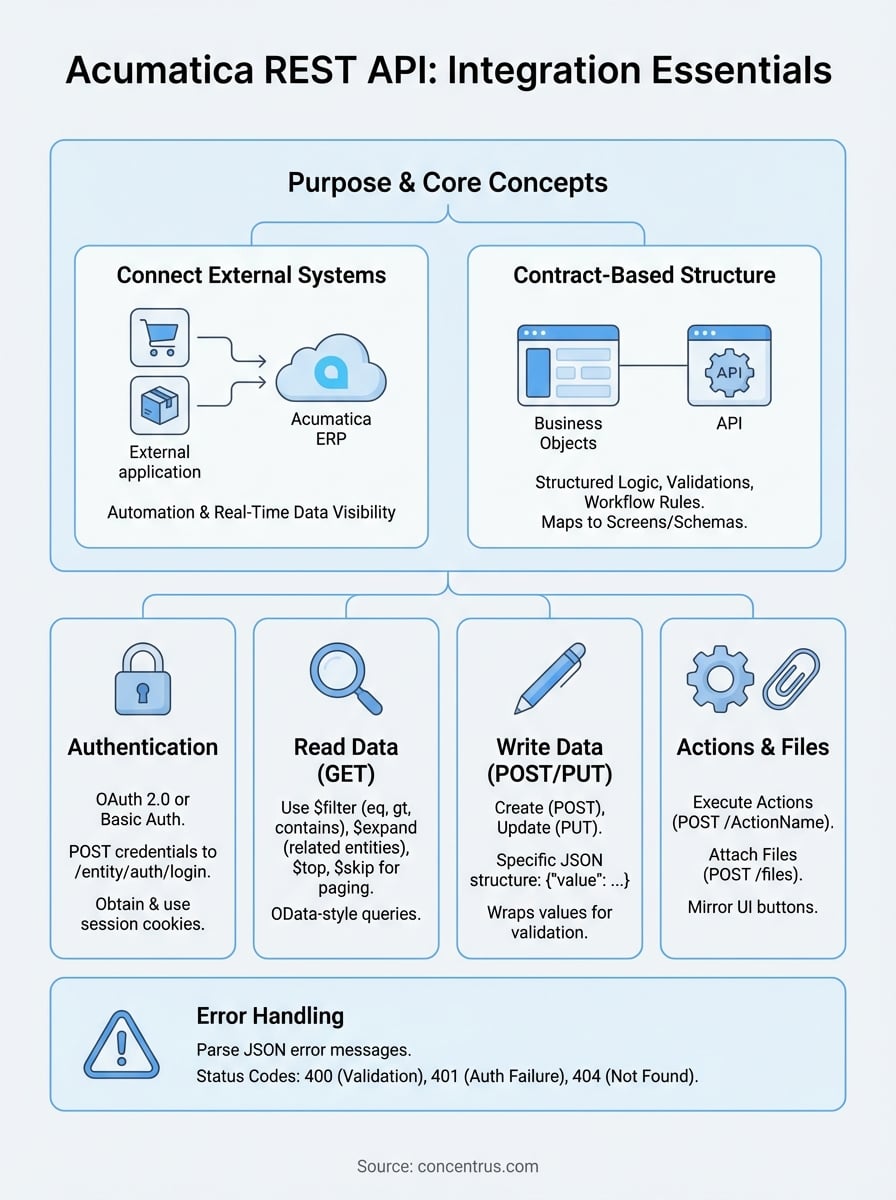
Connecting your external systems to Acumatica ERP can unlock powerful automation and real-time data visibility, but only if you understand how to work with the platform’s integration layer. The Acumatica REST API documentation provides the technical foundation for building these connections, yet navigating contract-based endpoints, authentication methods, and response handling often proves challenging without clear guidance.
Whether you’re building a custom integration, connecting a third-party application, or troubleshooting an existing setup, knowing the right approach saves hours of trial and error. The contract-based REST API offers flexibility and structure, but it requires understanding specific conventions that differ from generic REST implementations.
At Concentrus, we’ve implemented and rescued countless Acumatica ERP projects for midsized companies. Our team regularly works with the REST API during integrations that tie inventory systems, e-commerce platforms, and financial tools back to a single source of truth. This guide compiles the practical examples and best practices we’ve learned through hands-on implementation work, covering authentication, CRUD operations, error handling, and performance optimization. By the end, you’ll have a clear reference for building reliable Acumatica integrations that support your operational and financial goals.
What Acumatica contract-based REST API covers
The Acumatica contract-based REST API gives you programmatic access to business objects defined in the system’s contract schemas, which map directly to the Generic Inquiries and screens you configure in the web interface. Unlike OData or generic REST APIs that expose database tables, this approach surfaces structured business logic, validations, and workflow rules that Acumatica already enforces internally. You work with familiar entities like Sales Orders, Customers, Inventory Items, and Journal Transactions through predefined contracts that maintain data integrity.
Core entities and operations you can access
You can interact with over 200 default endpoints covering financial management, order management, inventory, purchasing, project accounting, and CRM modules. Each endpoint corresponds to a specific screen in Acumatica and inherits the same field visibility, required validations, and business rules that users encounter in the browser interface. Common entities include SalesOrder, Customer, Vendor, StockItem, ShipmentDetail, Payment, Employee, and OpportunityDetail. The acumatica rest api documentation lists every available contract along with its fields, relationships, and supported operations.
Operations follow standard REST conventions: GET requests retrieve records, POST creates new records, PUT updates existing records by full replacement, and DELETE removes records if the entity supports deletion. You also gain access to specialized actions like releasing documents, processing payments, or updating shipment status through dedicated action endpoints that mirror the buttons users click in Acumatica screens.
The contract-based approach means you work with the same business logic and constraints that govern user interactions, reducing integration errors and data inconsistencies.
Data format and response structure
All requests and responses use JSON formatting with specific naming conventions that reflect Acumatica’s internal field structure. Field names match the exact capitalization used in the screen definition, which typically follows PascalCase for standard fields. You’ll encounter custom objects within responses that hold user-defined fields, and note objects that contain file attachments and notes linked to records.
The API returns detailed metadata within each response, including field types, maximum lengths, allowed values for dropdown fields, and parent-child relationships between entities. Linked records appear as nested objects when you request expansion, letting you retrieve a Sales Order with its line items, shipping address, and customer details in a single call rather than multiple round trips.
Set up access, versions, and endpoints
Before you send your first API call, you need to authenticate with Acumatica and construct proper endpoint URLs that target the correct API version and instance. The acumatica rest api documentation requires OAuth 2.0 or basic authentication depending on your integration architecture, with OAuth recommended for production environments that require token refresh capabilities and granular permission control.
Authentication and credentials
You authenticate by sending credentials to the login endpoint at your Acumatica instance URL followed by /entity/auth/login. Your POST request body includes your company name, branch identifier, username, and password in JSON format. The system returns session cookies that you attach to subsequent requests, eliminating the need to resend credentials with every call.

POST https://yourinstance.acumatica.com/entity/Default/23.200.001/entity/auth/login
{
  "name": "admin",
  "password": "yourpassword",
  "company": "CompanyName",
  "branch": "MAIN"
}
Store the returned cookies and include them in the Cookie header for all future requests during that session. Sessions expire after a configured timeout period, typically 20 minutes of inactivity, requiring you to reauthenticate and obtain fresh cookies when your application resumes activity.
Endpoint structure and version paths
Your base endpoint URL follows the pattern https://[instance].acumatica.com/[tenant]/[version]/entity/[EntityName], where the version number matches the Acumatica release you’re targeting. Use version 23.200.001 for 2023 R2 installations, 22.200.001 for 2022 R2, and so on. The entity name matches the contract schema exactly, such as SalesOrder, Customer, or StockItem with precise capitalization.
Mismatched version numbers or incorrect entity capitalization return 404 errors, so verify your instance version before building endpoint strings.
Read data with $filter, $expand, and paging
Retrieving records from Acumatica requires you to construct GET requests with query parameters that filter results, expand related entities, and control pagination. The acumatica rest api documentation supports OData-style query syntax using $filter, $expand, $top, and $skip parameters that let you retrieve exactly the data you need without pulling entire datasets into memory. You append these parameters to your endpoint URL to build precise queries that return relevant records.
Query parameters for filtering records
You filter records by adding $filter parameters with field comparisons using operators like eq (equals), gt (greater than), lt (less than), ge (greater than or equal), and contains for partial text matches. Combine multiple conditions with and or or logical operators to create complex filters that narrow your result set before data leaves the server.
GET /entity/Default/23.200.001/SalesOrder?$filter=Status eq 'Open' and OrderTotal gt 1000
Field names in your filter string must match the exact capitalization from the contract schema, and you enclose text values in single quotes while leaving numeric values unquoted.
Expand related entities
Use $expand parameters to include child records and linked entities within a single response rather than making separate requests for each relationship. You can expand line items, addresses, contacts, and other nested objects by listing the relationship names separated by commas.
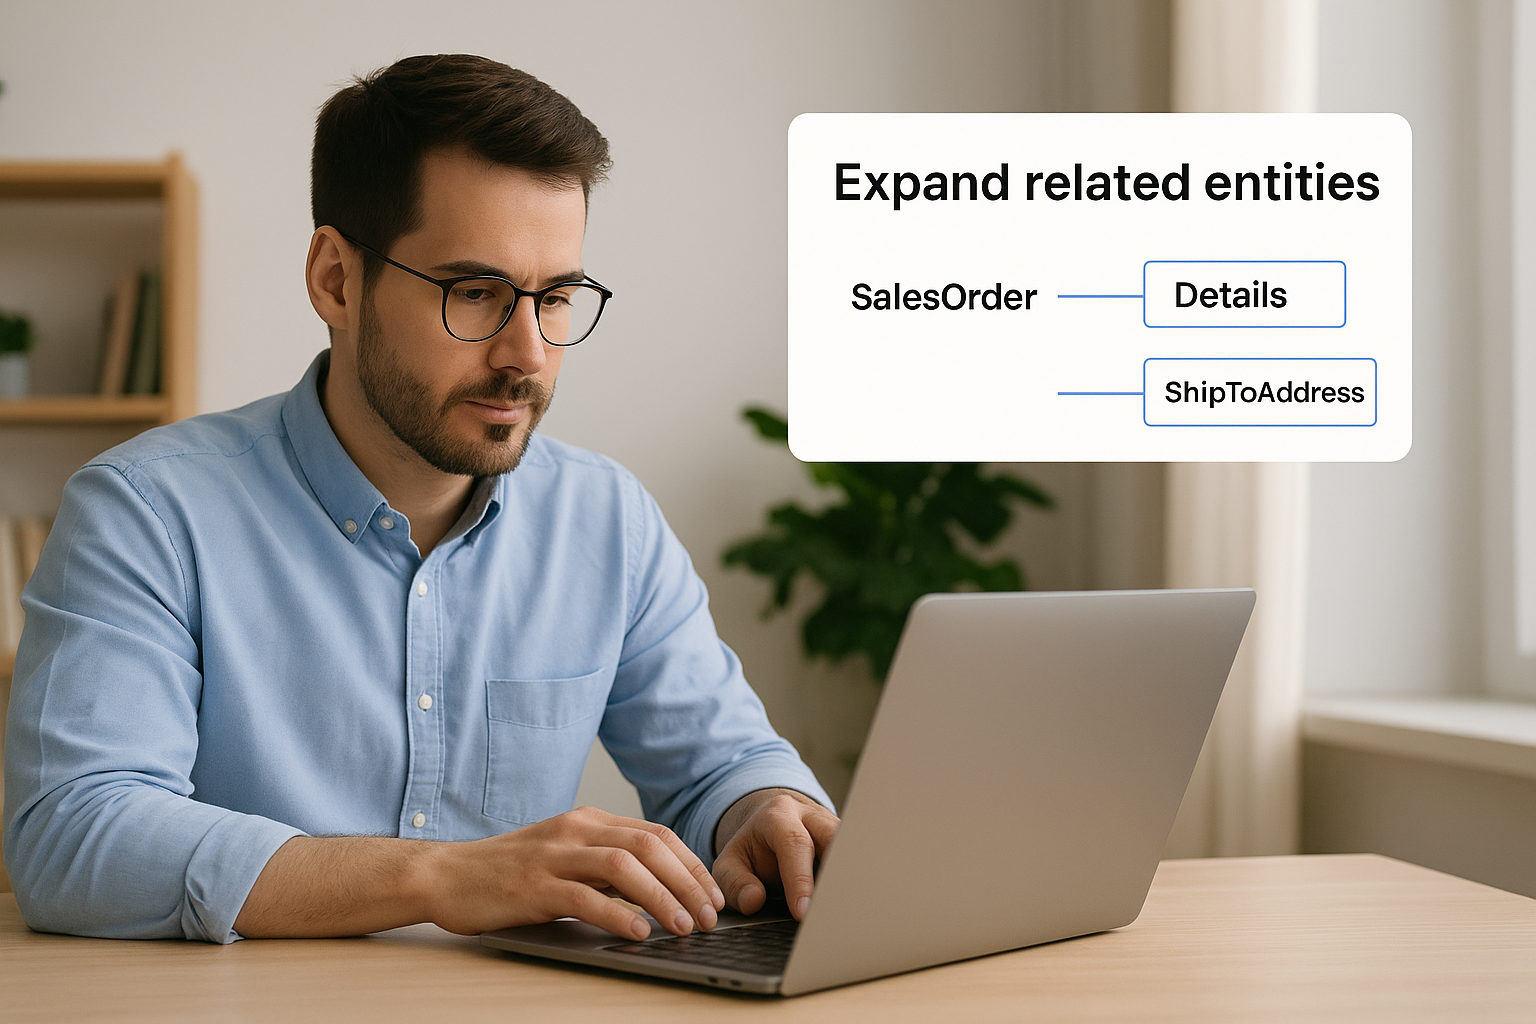
GET /entity/Default/23.200.001/SalesOrder/SO123456?$expand=Details,ShipToAddress
Expanding multiple relationships in one call reduces round trips and improves integration performance, especially when you need complete order details with line items and customer data.
Handle large result sets with paging
Implement paging by combining $top to limit records per page and $skip to move through result sets sequentially. Request the first 50 records with $top=50, then retrieve the next batch using $top=50&$skip=50, continuing until you receive fewer records than your page size.
Write data: create, update, and upsert patterns
Modifying data in Acumatica requires you to send properly formatted JSON payloads that match the entity’s contract structure exactly as defined in the acumatica rest api documentation. You create new records with POST requests, update existing records with PUT, and handle conditional logic by checking for existence before choosing your operation. Each write operation returns a complete representation of the resulting record including system-generated fields like document numbers and timestamps, giving you immediate confirmation of the applied changes.
Create new records with POST
You create records by sending a POST request to the entity endpoint with a JSON body containing all required fields and any optional fields you want to populate. The API validates your payload against business rules, generates auto-numbered fields like order numbers, and returns the complete created record with its unique identifier.
POST /entity/Default/23.200.001/SalesOrder
{
  "CustomerID": {"value": "CUSTOMER01"},
  "OrderType": {"value": "SO"},
  "Details": [
    {
      "InventoryID": {"value": "ITEM123"},
      "OrderQty": {"value": 10},
      "UnitPrice": {"value": 99.99}
    }
  ]
}
Notice that each field wraps its value in an object with a value property, matching Acumatica’s internal structure for consistent data handling across all entity types.
Wrapping values in the value property structure prevents type mismatches and ensures your payloads align with Acumatica’s validation engine.
Update existing records with PUT
You update records by sending a PUT request that includes the record’s unique identifier in the URL path and a JSON body containing the fields you want to change. The system replaces the specified fields while preserving unchanged fields, then returns the updated record with all current values.
PUT /entity/Default/23.200.001/SalesOrder/SO123456
{
  "Status": {"value": "Hold"}
}
Run actions, attach files, and debug errors
Beyond basic CRUD operations, you need to execute business actions, manage file attachments, and troubleshoot errors that occur during integration development. The acumatica rest api documentation includes action endpoints that mirror user interface buttons like releasing documents, processing payments, or updating shipment status. You also handle file attachments through dedicated endpoints that link files to parent records, and you diagnose failures by parsing error responses that contain field-level validation messages and business logic violations.
Execute entity actions with POST
You trigger actions by sending POST requests to action endpoints that follow the pattern /entity/[EntityName]/[RecordID]/[ActionName]. Common actions include ReleaseDocument for sales orders, ProcessPayment for AR invoices, and ConfirmShipment for shipment records. The request body typically remains empty unless the action requires parameters.
POST /entity/Default/23.200.001/SalesOrder/SO123456/ReleaseDocument
Each action returns a status response indicating success or failure along with updated record data reflecting the new state after processing.
Attach files to records
You attach files by sending multipart/form-data POST requests to the /files endpoint with the file content and parent record identifiers. Include the entity name and record key in your request headers to link the attachment properly.
Attaching supporting documents like purchase orders or shipping labels through the API creates complete audit trails without manual user uploads.
Debug common API errors
Parse error responses that return HTTP status codes with detailed JSON error messages containing the field name, attempted value, and validation rule that failed. Status 400 indicates validation errors, 401 signals authentication failures, and 404 means the entity or record doesn’t exist at the specified path.
Wrap-up and what to do next
The acumatica rest api documentation provides a structured approach to building integrations that automate workflows, sync external systems, and maintain data consistency across your technology stack. You now understand authentication patterns, query construction, data modification operations, and action execution that form the foundation of reliable API connections. These capabilities let you extend Acumatica’s functionality beyond the web interface and create custom solutions that match your unique operational requirements.
Start by testing authentication and simple GET requests against a sandbox environment before moving to production integrations. Build error handling into every API call to catch validation failures early, and implement logging that captures request details for troubleshooting. Document your integration patterns so your team can maintain and extend the work as your business grows.
If you need expert guidance on Acumatica ERP implementation or rescuing underperforming systems, Concentrus specializes in delivering guaranteed ROI through our proven methodology that ties technology directly to measurable financial outcomes.